文章目录[隐藏]
前言
本教程适用于云筏的NAT服务器,地址:https://my.cloudraft.cn/server/buy.html?lineid=1012
CentOS7
开启IPv6功能
有些镜像是禁用了IPv6功能的,因此需要开启。首先查看一下是否被禁用了:
[root@hSxavP1000044 network-scripts]# sysctl -a | grep ipv6.*disable
sysctl: reading key "net.ipv6.conf.all.stable_secret"
net.ipv6.conf.all.disable_ipv6 = 1
sysctl: net.ipv6.conf.default.disable_ipv6 = 1
reading key "net.ipv6.conf.default.stable_secret"
sysctl: reading key "net.ipv6.conf.eth0.stable_secret"
net.ipv6.conf.eth0.disable_ipv6 = 1
sysctl: reading key "net.ipv6.conf.lo.stable_secret"
net.ipv6.conf.lo.disable_ipv6 = 1
disable=1说明被禁用了,因此需要去修改,配置文件为/etc/sysctl.conf
vi /etc/sysctl.conf
#把ipv6 disable的参数都改为0,然后保存,重载服务后生效
[root@hSxavP1000044 ~]# sysctl -p
vm.swappiness = 0
net.ipv4.neigh.default.gc_stale_time = 120
net.ipv4.conf.all.rp_filter = 0
net.ipv4.conf.default.rp_filter = 0
net.ipv4.conf.default.arp_announce = 2
net.ipv4.conf.lo.arp_announce = 2
net.ipv4.conf.all.arp_announce = 2
net.ipv4.tcp_max_tw_buckets = 5000
net.ipv4.tcp_syncookies = 1
net.ipv4.tcp_max_syn_backlog = 1024
net.ipv4.tcp_synack_retries = 2
net.ipv6.conf.all.disable_ipv6 = 0
net.ipv6.conf.default.disable_ipv6 = 0
net.ipv6.conf.lo.disable_ipv6 = 0
设置网卡,启用DHCP
修改网卡配置文件:
vi /etc/sysconfig/network-scripts/ifcfg-eth0
在原有配置后面增加输入以下信息:
Networking_IPV6=yes
DHCPV6C=yes
IPV6INIT=yes
然后重启网络:
service network restart
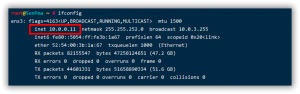
检查是否生效
[root@hSxavP1000044 network-scripts]# ip addr 1: lo:mtu 65536 qdisc noqueue state UNKNOWN group default qlen 1000 link/loopback 00:00:00:00:00:00 brd 00:00:00:00:00:00 inet 127.0.0.1/8 scope host lo valid_lft forever preferred_lft forever inet6 ::1/128 scope host valid_lft forever preferred_lft forever 2: eth0: mtu 1500 qdisc mq state UP group default qlen 1000 link/ether 00:15:5d:1a:f7:05 brd ff:ff:ff:ff:ff:ff inet 172.16.2.7/12 brd 172.31.255.255 scope global eth0 valid_lft forever preferred_lft forever inet6 2a01:4f8:212:1234:215:5dff:fe1a:f705/64 scope global mngtmpaddr dynamic valid_lft 2591920sec preferred_lft 604720sec inet6 fe80::215:5dff:fe1a:f705/64 scope link valid_lft forever preferred_lft forever
注意看eth0的网卡中ipv6地址是否被分配
[root@hSxavP1000044 network-scripts]# ping6 ipv6.google.com
PING ipv6.google.com(yw-in-x66.1e100.net (2607:f8b0:4002:c05::66)) 56 data bytes
64 bytes from yw-in-x66.1e100.net (2607:f8b0:4002:c05::66): icmp_seq=1 ttl=103 time=107 ms
64 bytes from yw-in-x66.1e100.net (2607:f8b0:4002:c05::66): icmp_seq=2 ttl=103 time=107 ms
^C
--- ipv6.google.com ping statistics ---
2 packets transmitted, 2 received, 0% packet loss, time 1002ms
rtt min/avg/max/mdev = 107.212/107.398/107.584/0.186 ms
ping6测试google的ipv6站点是否能通
[root@hSxavP1000044 network-scripts]# ip -6 route
2a01:4f8:212:1234::/64 dev eth0 proto kernel metric 256 expires 2591804sec pref medium
fe80::/64 dev eth0 proto kernel metric 256 pref medium
default via fe80::24b9:6e08:f5fd:b36f dev eth0 proto ra metric 1024 expires 1604sec pref medium
查看ipv6路由表
Debian / Ubuntu
开启IPv6功能
有些镜像是禁用了IPv6功能的,因此需要开启。首先查看一下是否被禁用了:
root@HIzcND1000044:~# sysctl -a | grep ipv6.*disable
sysctl: reading key "net.ipv6.conf.all.stable_secret"
net.ipv6.conf.all.disable_ipv6 = 1
sysctl: reading key "net.ipv6.conf.default.stable_secret"
net.ipv6.conf.default.disable_ipv6 = 1
sysctl: reading key "net.ipv6.conf.eth0.stable_secret"
net.ipv6.conf.eth0.disable_ipv6 = 1
sysctl: reading key "net.ipv6.conf.lo.stable_secret"
net.ipv6.conf.lo.disable_ipv6 = 1
disable=1说明被禁用了,因此需要去修改,配置文件为/etc/sysctl.conf
vi /etc/sysctl.conf
#把ipv6 disable的参数都改为0,然后保存,重载服务后生效
[root@hSxavP1000044 ~]# sysctl -p
root@HIzcND1000044:~# sysctl -p
vm.swappiness = 0
net.ipv4.neigh.default.gc_stale_time = 120
net.ipv4.conf.all.rp_filter = 0
net.ipv4.conf.default.rp_filter = 0
net.ipv4.conf.default.arp_announce = 2
net.ipv4.conf.lo.arp_announce = 2
net.ipv4.conf.all.arp_announce = 2
net.ipv4.tcp_max_tw_buckets = 5000
net.ipv4.tcp_syncookies = 1
net.ipv4.tcp_max_syn_backlog = 1024
net.ipv4.tcp_synack_retries = 2
net.ipv6.conf.all.disable_ipv6 = 0
net.ipv6.conf.default.disable_ipv6 = 0
net.ipv6.conf.lo.disable_ipv6 = 0
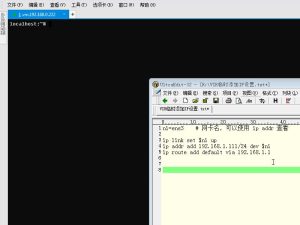
设置网卡,启用DHCP
nano /etc/network/interfaces
添加一行iface eth0 inet6 dhcp,举例示意:
# This file describes the network interfaces available on your system
# and how to activate them. For more information, see interfaces(5).

source /etc/network/interfaces.d/*

# The loopback network interface
auto lo
iface lo inet loopback

# The primary network interface
auto eth0
iface eth0 inet static
address 172.16.2.X
netmask 255.240.0.0
gateway 172.16.2.1

iface eth0 inet6 dhcp
重启网络,检查是否正常
service networking restart
文章来源于互联网:Linux下通过DHCP服务器获取IPv6地址
昨天讲了JAVA的JNI,今天讲一下如何用CE(Cheat Engine)查找游戏的基址, 基址就是游戏在内存中的一个静态的内存地址,可以通过偏移找到本次游戏的数据地址。 今天就拿最经典的游戏植物大战僵尸来练手,首先每个版本的植物大战僵尸的基址和偏移都不同, …
© 版权声明
文章版权归作者所有,未经允许请勿转载。
THE END
喜欢就支持一下吧


请登录后发表评论
注册