对于一种技术的好坏或者方案都需要用辩证思维去看待,不能因为人云亦云就选择去相信,实践是检验真理的唯一标准。
这一篇文章主要讲jxwaf在init阶段所做的行为以及作用
在jxwaf的nginx配置文件里面有两个init阶段:init_by_lua_file和init_worker_by_lua_file
init_by_lua_file /opt/jxwaf/lualib/resty/jxwaf/init.lua;
init_worker_by_lua_file /opt/jxwaf/lualib/resty/jxwaf/init_worker.lua;
init_by_lua_file:
当nginx master进程在加载nginx配置文件时运行指定的lua脚本, 通常用来注册lua的全局变量或在服务器启动时预加载lua模块。
init_worker_by_lua_file:
在每个nginx worker进程启动时调用指定的lua代码。如果master 进程不允许,则只会在init_by_lua之后调用。这个hook通常用来创建每个工作进程的计时器(定时计划),进行后端健康检查或者重载nginx。
init.lua
resty.core
require "resty.core"
原本openresty是基于lua-nginx-module ,调用 C 函数的 API进行实现,现在新版FFI模式进行处理,lua-resty-core 是把 lua-nginx-module 已有的部分 API,使用 FFI 的模式重新实现了一遍。这样做的好处就是性能处理大大提升,这样说过于抽象,下面使用例子说明,使用旧版1.13.6.2进行测试,新版默认开启了lua-resty-core ,测试不了。可以到这里看具体:为什么你应该在 OpenResty 项目中使用 lua-resty-core
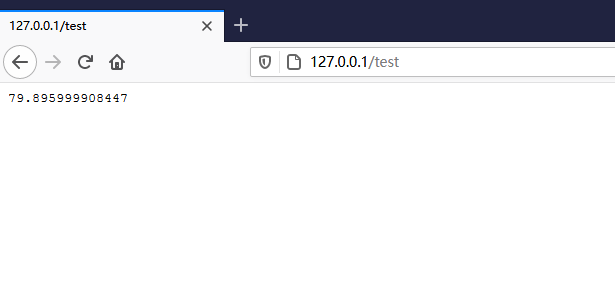
下面代码是没有使用lua-resty-core,循环10亿次进行base64加密,时间是80秒
local start = ngx.now();
for _ =1, 1000000000 do
    ngx.encode_base64('123456')
end
ngx.update_time();
ngx.say(ngx.now() - start)
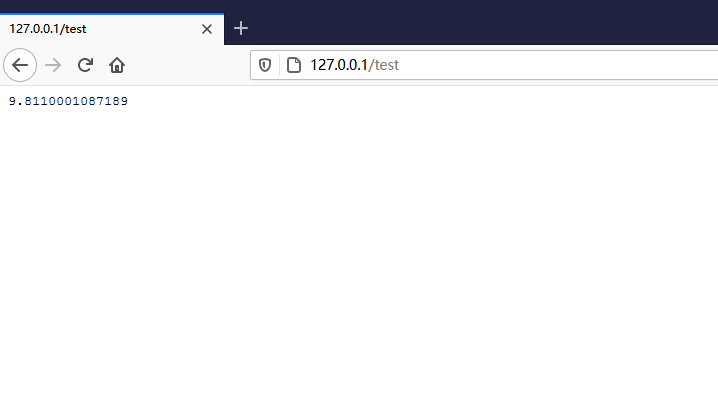
下面代码是使用lua-resty-core,循环10亿次进行base64加密,时间是10秒。可以看到用了lua-resty-core的性能提高了8倍,效果惊人。
require 'resty.core';
local start = ngx.now();
for _ =1, 1000000000 do
    ngx.encode_base64('123456')
end
ngx.update_time();
ngx.say(ngx.now() - start)
resty.jxwaf.waf
local waf = require "resty.jxwaf.waf"
local config_path = "/opt/jxwaf/nginx/conf/jxwaf/jxwaf_config.json"
waf.init(config_path)
第一行,引入waf.lua里面的模块函数。
第二行,是jxwaf配置文件,其中waf_api_key和waf_api_password是与WEB控制台通信的密钥,waf_update_website和waf_monitor_website是WEB控制台的地址,waf_local是否开启本地模式也就是不与控制台通信(目前控制台开源,所以不用管这个参数),server_info是服务器一些详细信息,waf_node_monitor是WAF节点健康监控检测。
{
    "waf_api_key": "5fc335bc-d778-4d90-ab3f-ece36bad4a24",
    "waf_api_password": "6bace0ac-ddca-412f-b768-81407044ea0c",
    "waf_update_website": "http://update2.jxwaf.com/waf_update",
    "waf_monitor_website": "http://update2.jxwaf.com/waf_monitor",
    "waf_local":"false",
    "server_info":"server_info_detail",
    "waf_node_monitor":"true"
}
第三行是初始化配置文件,来分析一些它是怎么运作。找到waf.lua文件,摘取处理部分的代码
local _M = {}
local _config_path = "/opt/jxwaf/nginx/conf/jxwaf/jxwaf_config.json"

function _M.init(config_path)
	local init_config_path = config_path or _config_path
	local read_config = assert(io.open(init_config_path,'r+'))
	local raw_config_info = read_config:read('*all')
  read_config:close()
	local config_info = cjson.decode(raw_config_info)
	if config_info == nil then
		ngx.log(ngx.ERR,"init fail,can not decode config file")
	end
  if not config_info['waf_node_uuid'] then
    local waf_node_uuid = uuid.generate_random()
    config_info['waf_node_uuid'] = waf_node_uuid
    local new_config_info = cjson.encode(config_info)
    local write_config = assert(io.open(init_config_path,'w+'))
    write_config:write(new_config_info)
    write_config:close()
  end
	_config_info = config_info
  iputils.enable_lrucache()
  local ok, err = process.enable_privileged_agent()
  if not ok then
    ngx.log(ngx.ERR, "enables privileged agent failed error:", err)
  end
  ngx.log(ngx.ALERT,"jxwaf init success,waf node uuid is ".._config_info['waf_node_uuid'])
end

return _M
我原来想用vscode去做openresty调试的,这样就会很麻烦,然后在网上找了ZeroBrane说可以调试openresty(网上一堆Windows,但是有些库需要自己编译,比如cjsno.dll,就没有搞),然后在Ubuntu测试无法调试,最后就干脆直接用vim一边写一遍调试结果出来给你们看。
首先使用定义名字为_M的模块,不懂lua模块概念可参考这里,一个模块通常视为一个table表 ,其他代码调用该模块就相当于调用table表,于是返回table,就相当于把代码内容暴露出去了。
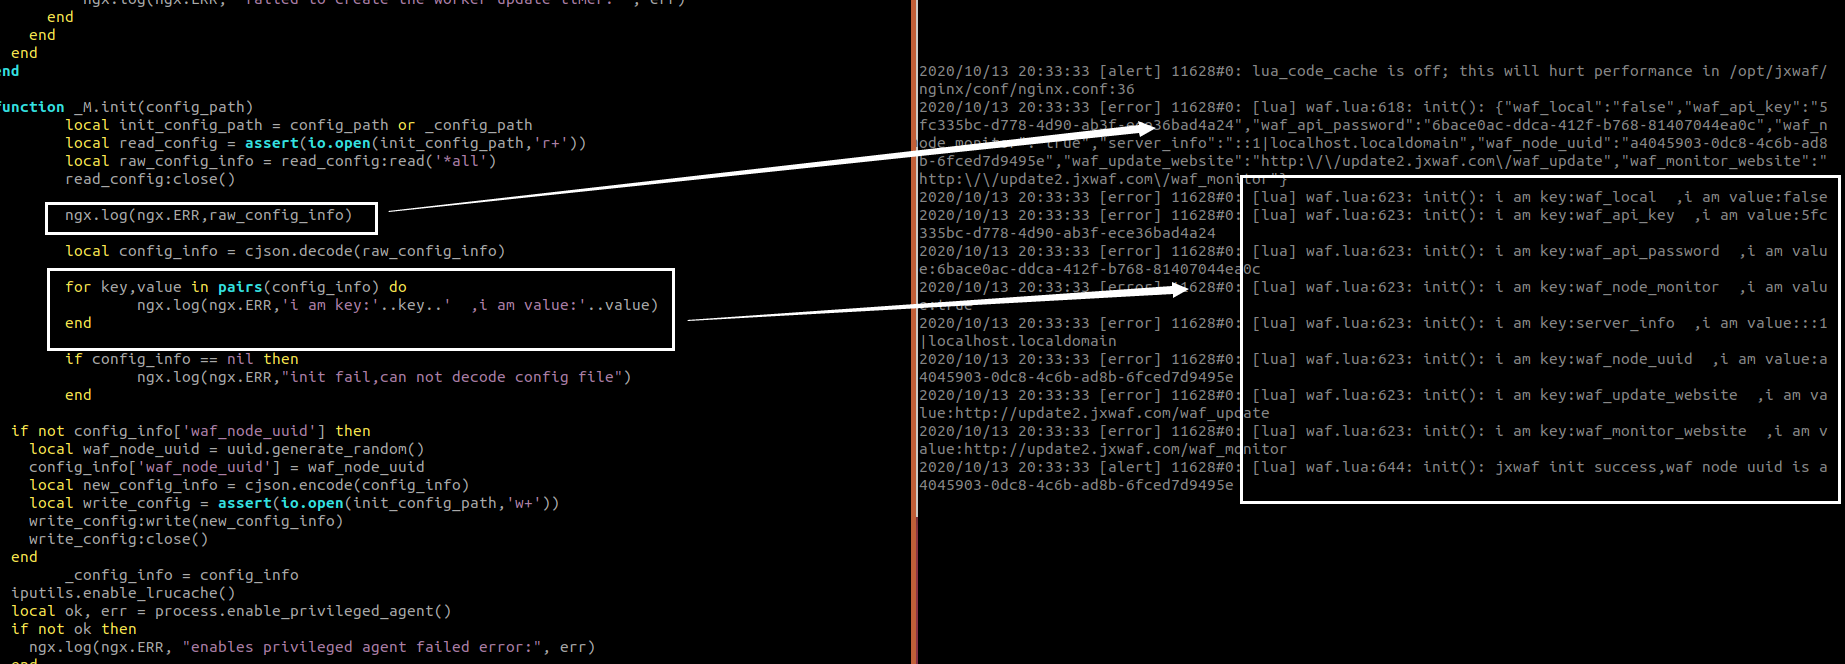
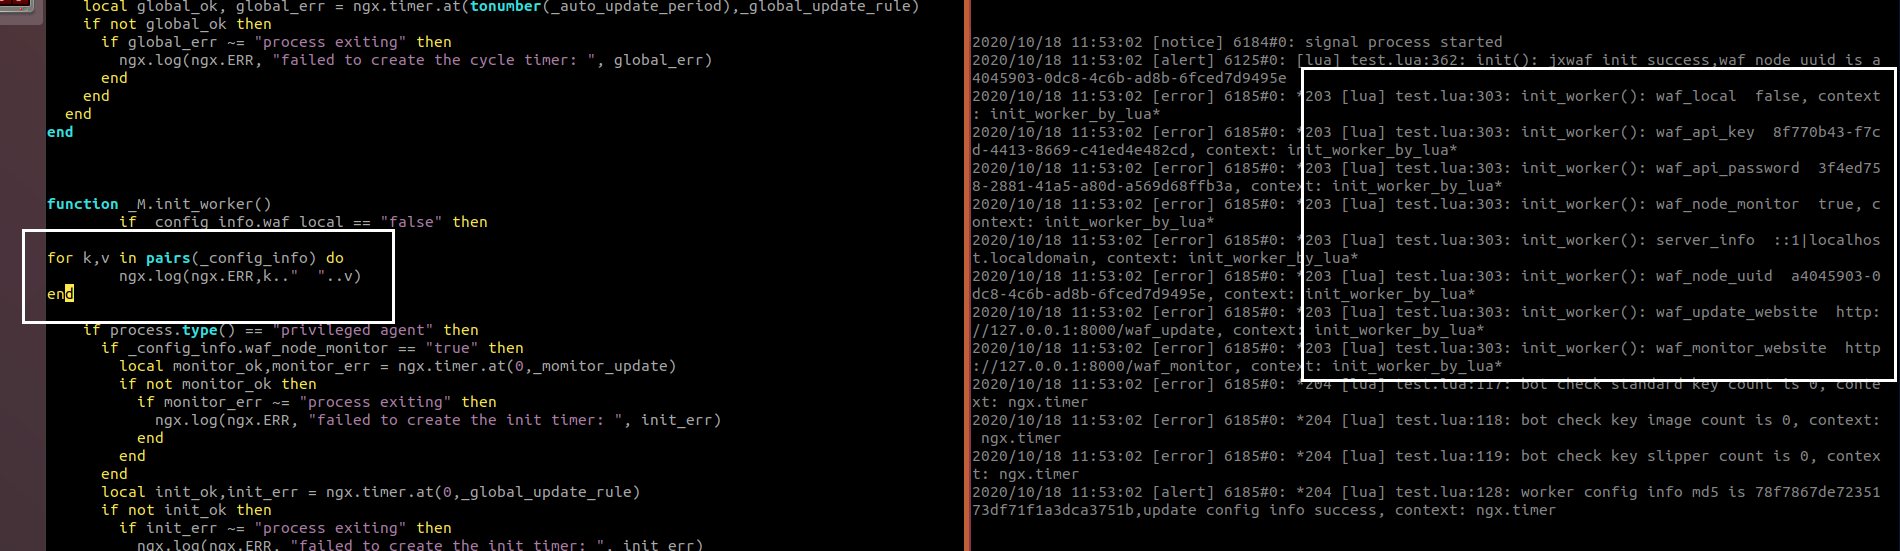
接着打开配置文件,用json库读取里面的内容文本,变成table(json),如下图所示,我使用error级别输出文本内容,并且循环输出table里面的内容。assert类似于try except作用,首先检查的是第一个参数是否返回错误,如果不返回错误,则assert简单返回,否则则以第二个参数抛出异常信息。
local init_config_path = config_path or _config_path
        local read_config = assert(io.open(init_config_path,'r+'))
        local raw_config_info = read_config:read('*all')
        read_config:close()
        local config_info = cjson.decode(raw_config_info)
        if config_info == nil then
                ngx.log(ngx.ERR,"init fail,can not decode config file")
        end
如果没有在配置文件找到waf_node_uuid参数,就会使用uuid库创建一个随机UUID字符串标识这台服务器节点,然后将内容重新写回到配置文件里面。
if not config_info['waf_node_uuid'] then
    local waf_node_uuid = uuid.generate_random()
    config_info['waf_node_uuid'] = waf_node_uuid
    local new_config_info = cjson.encode(config_info)
    local write_config = assert(io.open(init_config_path,'w+'))
    write_config:write(new_config_info)
    write_config:close()
  end
iputils库是处理IP用的,具体咱们可以做准入限制策略:白名单,黑名单,下面代码是创建一个IP地址规则保存空间(缓存)
iputils.enable_lrucache()
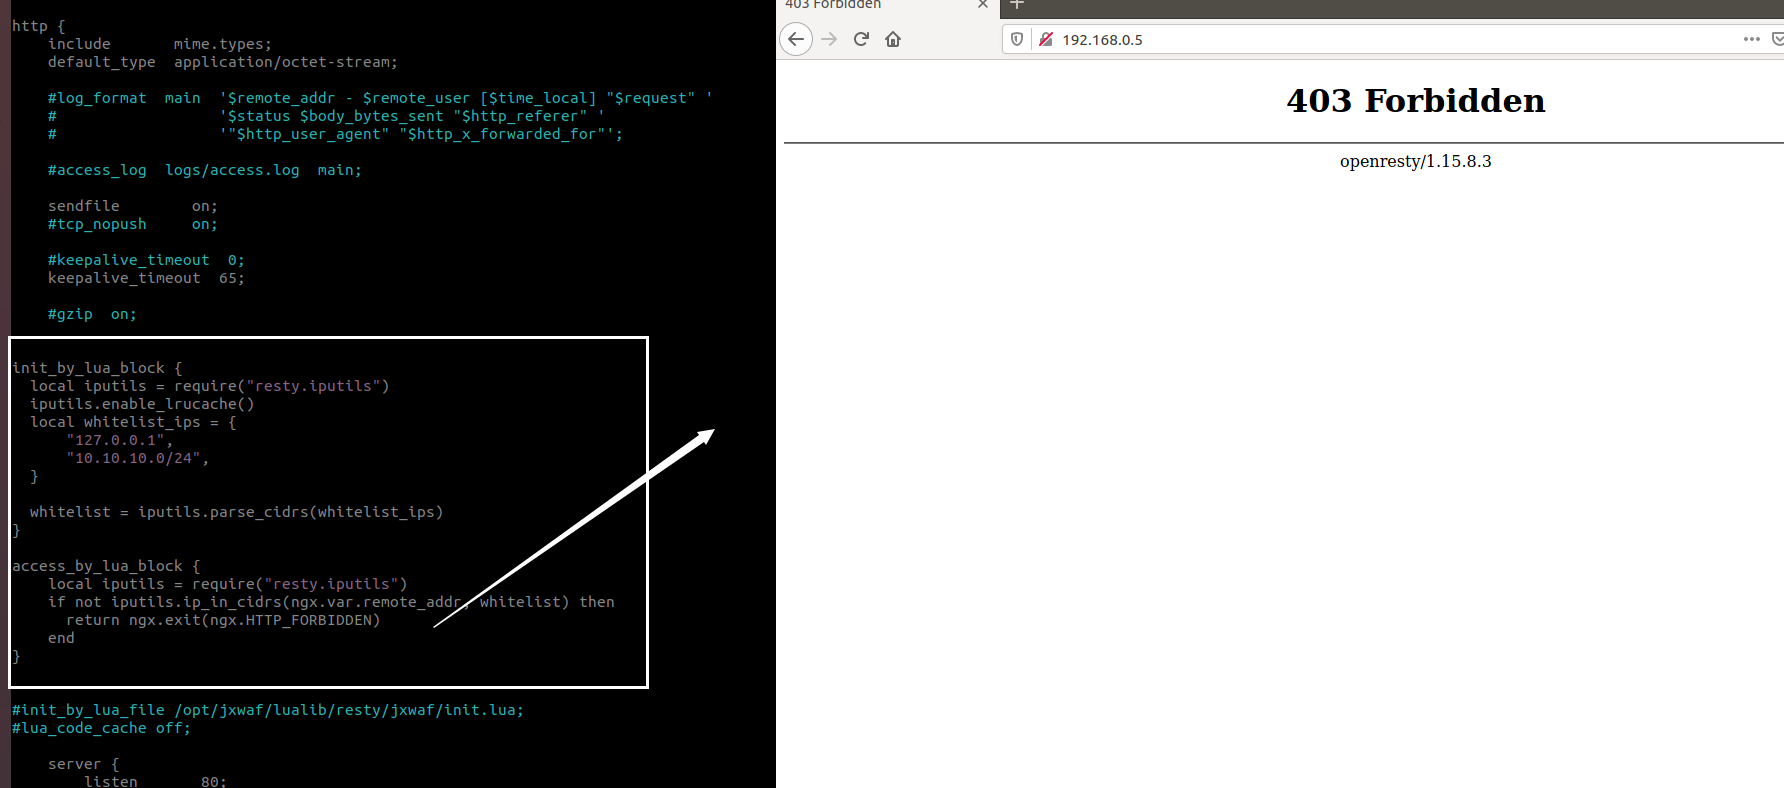
为了更加了解这个库作用,用官方的例子进行说明
init_by_lua_block {
  local iputils = require("resty.iputils")
  iputils.enable_lrucache()  --创建全局缓存空间
  local whitelist_ips = {
      "127.0.0.1",
      "10.10.10.0/24",
  }
--白名单地址
  -- WARNING: Global variable, recommend this is cached at the module level
  -- https://github.com/openresty/lua-nginx-module#data-sharing-within-an-nginx-worker

  whitelist = iputils.parse_cidrs(whitelist_ips) --取得CIDR格式IPV4网络表,并返回包含低地址和高地址的表的表。
}

access_by_lua_block {
    local iputils = require("resty.iputils")
    if not iputils.ip_in_cidrs(ngx.var.remote_addr, whitelist) then       --如果不在IP白名单内,返回403状态码
      return ngx.exit(ngx.HTTP_FORBIDDEN)
    end
}
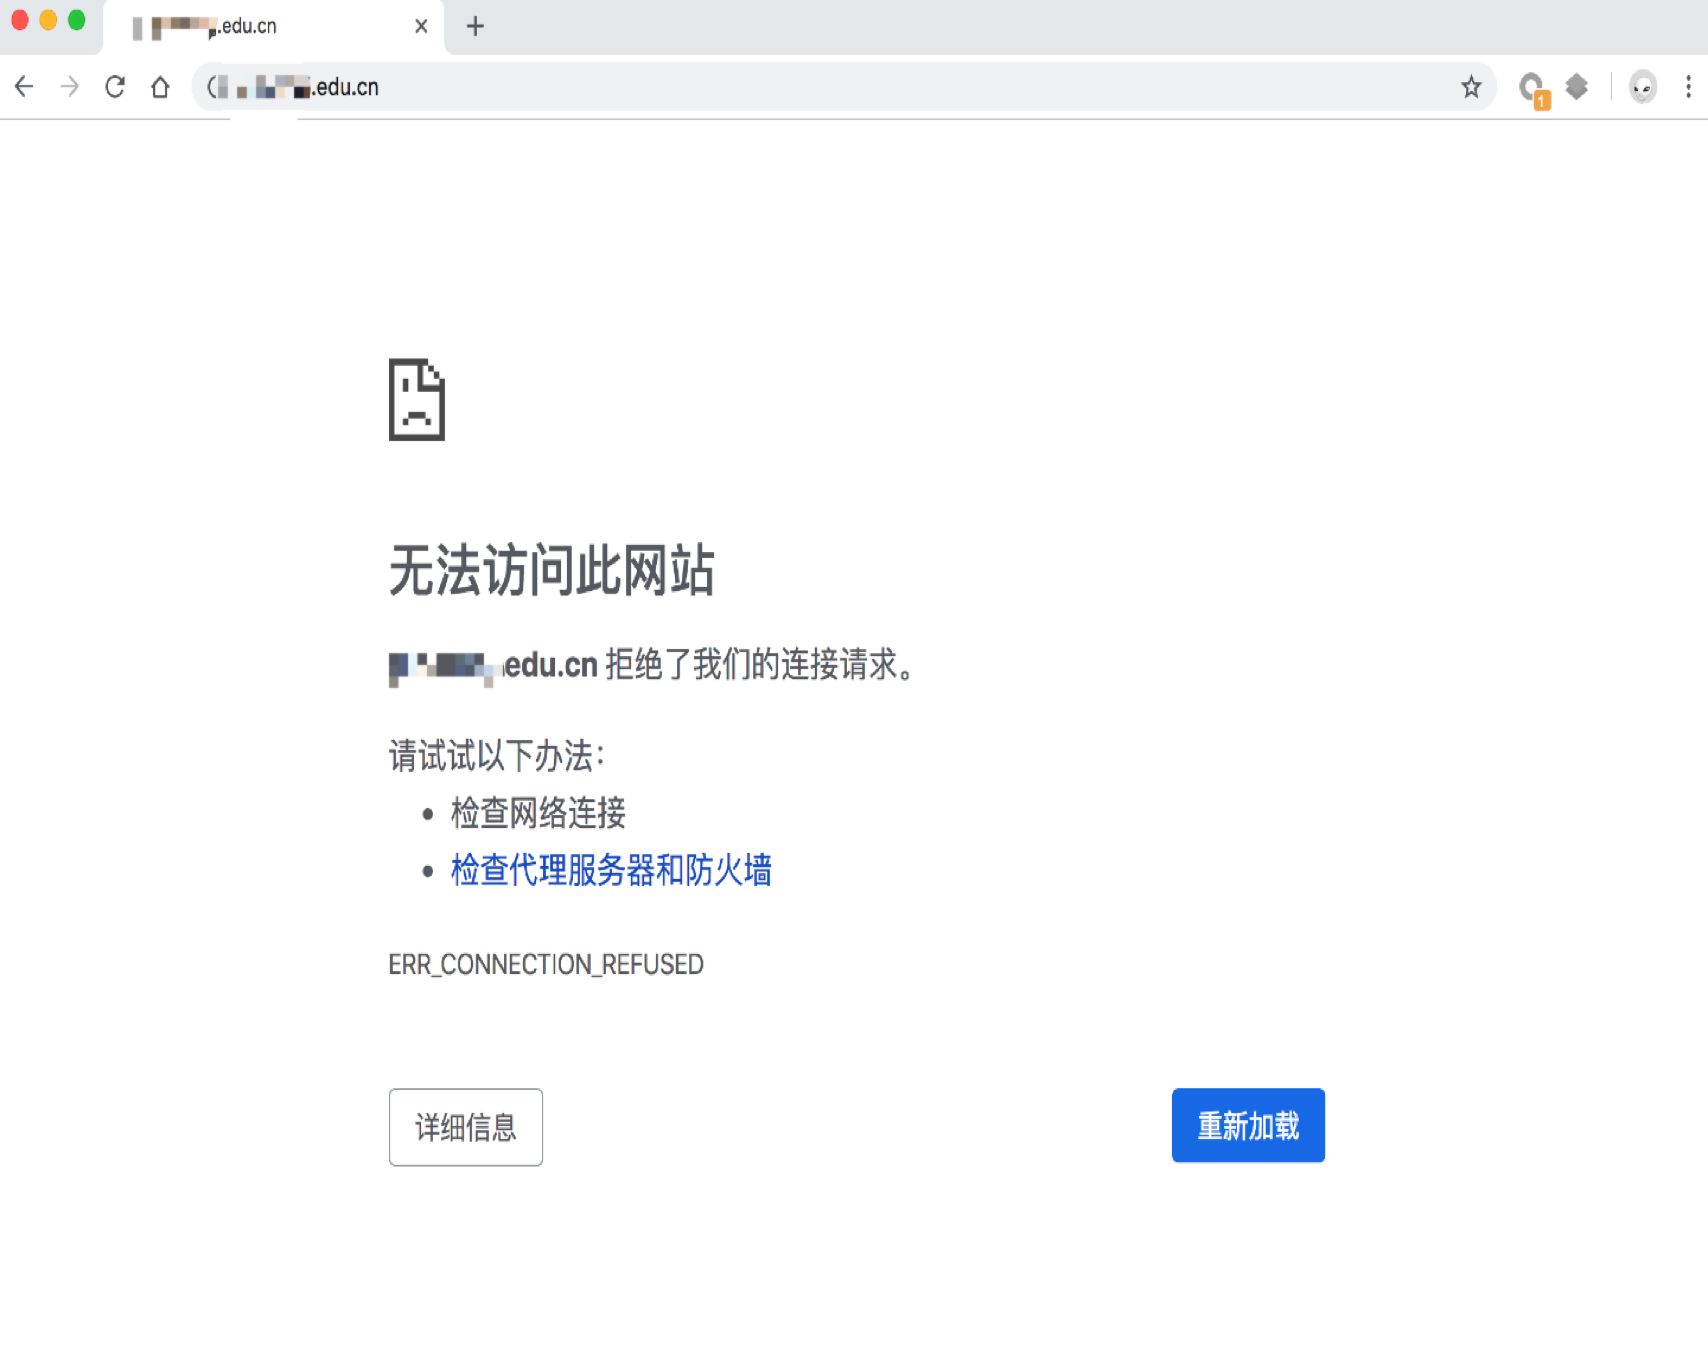
效果如下图所示
开启一个特殊的特权 nginx agent 进程,类似 worker 进程,但不监听虚拟主机的那些端口,同时也继承和 nginx master 进程一样的系统帐号。按照官方说这个进程可以控制操作系统,但是咱们不用这些,我们可以用它来自动重载nginx(reload)。
local ok, err = process.enable_privileged_agent()
  if not ok then
    ngx.log(ngx.ERR, "enables privileged agent failed error:", err)
  end
  ngx.log(ngx.ALERT,"jxwaf init success,waf node uuid is ".._config_info['waf_node_uuid'])
至此init阶段说明完毕,接下来说说init_work阶段,这个文件只有两段代码,在waf这个文件已经写好worker阶段处理逻辑。
local waf = require "resty.jxwaf.waf"
waf.init_worker()
init_worker.lua
在waf.lua找到init_worker函数,可以看到这个函数都是一些条件判断之后,跳进到其他逻辑处理函数里面。其中waf_local 这个变量已经没有用了,因为现在WEB控制台已经开源了,不用使用离线版更新规则。
function _M.init_worker()
	if _config_info.waf_local == "false" then
    if process.type() == "privileged agent" then
      if _config_info.waf_node_monitor == "true" then
        local monitor_ok,monitor_err = ngx.timer.at(0,_momitor_update)
        if not monitor_ok then
          if monitor_err ~= "process exiting" then
            ngx.log(ngx.ERR, "failed to create the init timer: ", init_err)
          end
        end
      end
      local init_ok,init_err = ngx.timer.at(0,_global_update_rule)
      if not init_ok then
        if init_err ~= "process exiting" then
          ngx.log(ngx.ERR, "failed to create the init timer: ", init_err)
        end
      end
    else
      local worker_init_ok,worker_init_err = ngx.timer.at(0,_worker_update_rule)
      if not worker_init_ok then
        if worker_init_err ~= "process exiting" then
          ngx.log(ngx.ERR, "failed to create the init timer: ", worker_init_err)
        end
      end
      local hdl, err = ngx.timer.every(5,_worker_update_rule)
      if err then
          ngx.log(ngx.ERR, "failed to create the worker update timer: ", err)
      end
    end
  end
end
在init阶段的时候已经读取文件内容存储到_config_info变量里面,输入打印key value的内容,就是jxwaf_config.json文件里面的内容。
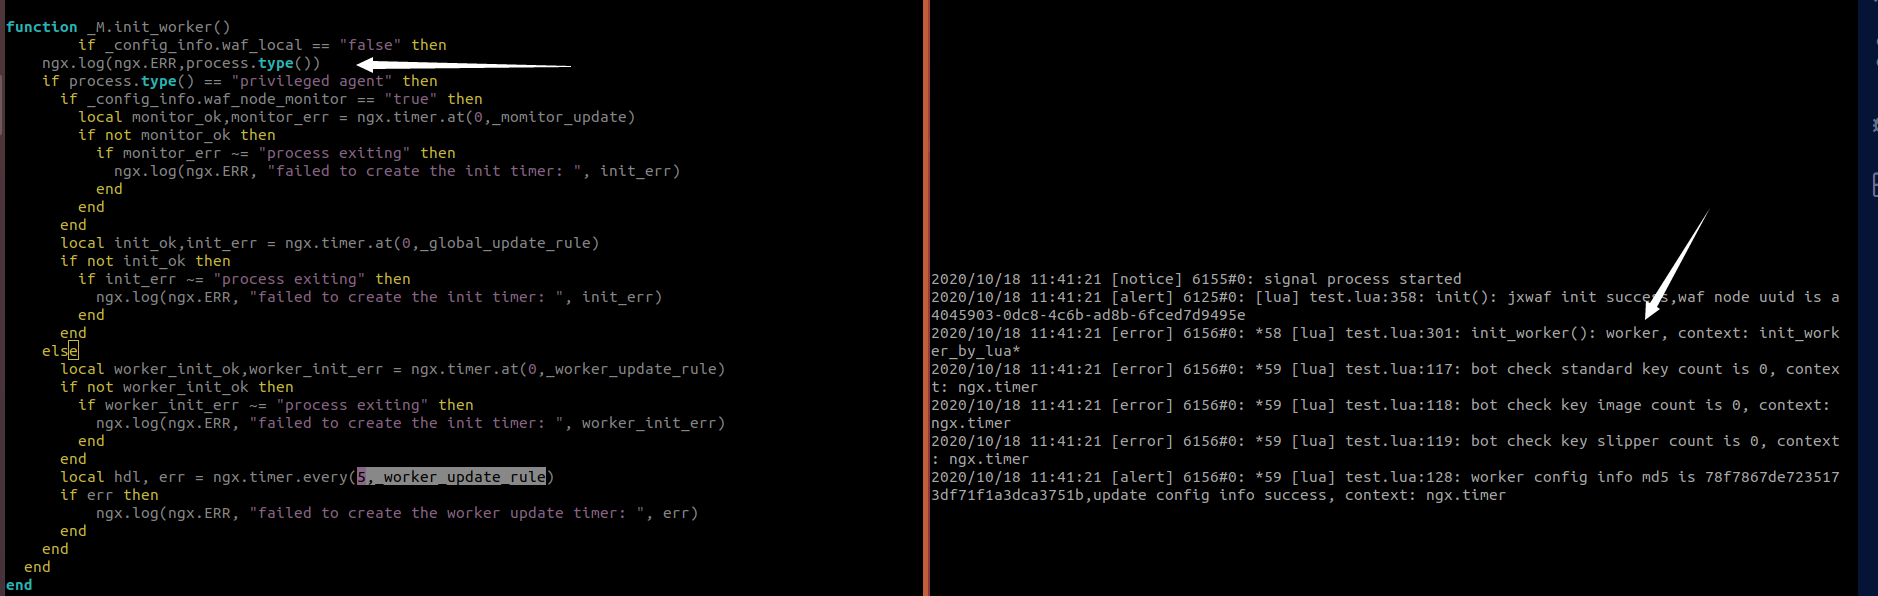
接着进入到进程类型的判别条件,关于特权代理(privileged agent)在上面已经说明了。在init阶段的时候启动特权代理,让我好奇的时候,不是特权代理的时候,会是什么类型?
修改init.lua文件,将它开启特权代理的代理给注释掉
--local ok, err = process.enable_privileged_agent()
  --if not ok then
  --  ngx.log(ngx.ERR, "enables privileged agent failed error:", err)
  --end
然后print进程类型,可以在右侧看到nginx运行的类型是worker,并且接下来使用worker去进行逻辑处理。
特权代理
if _config_info.waf_node_monitor == "true" then
local monitor_ok,monitor_err = ngx.timer.at(0,_momitor_update)
if not monitor_ok then
if monitor_err ~= "process exiting" then
ngx.log(ngx.ERR, "failed to create the init timer: ", init_err)
end
end
end
local init_ok,init_err = ngx.timer.at(0,_global_update_rule)
if not init_ok then
if init_err ~= "process exiting" then
ngx.log(ngx.ERR, "failed to create the init timer: ", init_err)
end
end
首先从配置文件判断是否要监控服务器节点,默认是监控的,所以会进入到定时器函数执行监控更新函数。
ok,err = ngx.timer.at(delay,callback,user_arg1,user_arg2 …),创建一个带有用户回调函数的Nginx定时器以及可选的用户参数。其中第一个参数是时间(延迟多久执行,类型于python的time.sleep),第二个参数指定函数名,如果该函数还有参数,则一直填充进去。
local function _momitor_update()
  local _update_website  =  _config_info.waf_monitor_website or "https://update2.jxwaf.com/waf_monitor"
  local httpc = http.new()
  httpc:set_timeouts(5000, 5000, 30000)
  local api_key = _config_info.waf_api_key or ""
  local api_password = _config_info.waf_api_password or ""
  local server_info = _config_info.server_info or ""
  local waf_node_uuid = _config_info.waf_node_uuid or ""
  local res, err = httpc:request_uri( _update_website , {
      method = "POST",
      body = "api_key="..api_key.."&api_password="..api_password.."&waf_node_uuid="..waf_node_uuid.."&server_info="..server_info,
      headers = {
      ["Content-Type"] = "application/x-www-form-urlencoded",
      }
  })
  if not res then
    ngx.log(ngx.ERR,"failed to request: ", err)
    return _update_at(tonumber(_auto_update_period),_momitor_update)
  end
  local res_body = cjson.decode(res.body)
  if not res_body then
    ngx.log(ngx.ERR,"init fail,failed to decode resp body " )
    return _update_at(tonumber(_auto_update_period),_momitor_update)
  end
  if  res_body['result'] == false then
    ngx.log(ngx.ERR,"init fail,failed to request, ",res_body['message'])
    return _update_at(tonumber(_auto_update_period),_momitor_update)
  end
  _waf_node_monitor = res_body['waf_node_monitor'] or _waf_node_monitor
  if _waf_node_monitor == "true" then
    local global_ok, global_err = ngx.timer.at(tonumber(_waf_node_monitor_period),_momitor_update)
    if not global_ok then
      if global_err ~= "process exiting" then
        ngx.log(ngx.ERR, "failed to create the cycle timer: ", global_err)
      end
    end
  end
  ngx.log(ngx.ALERT,"monitor report success")
end
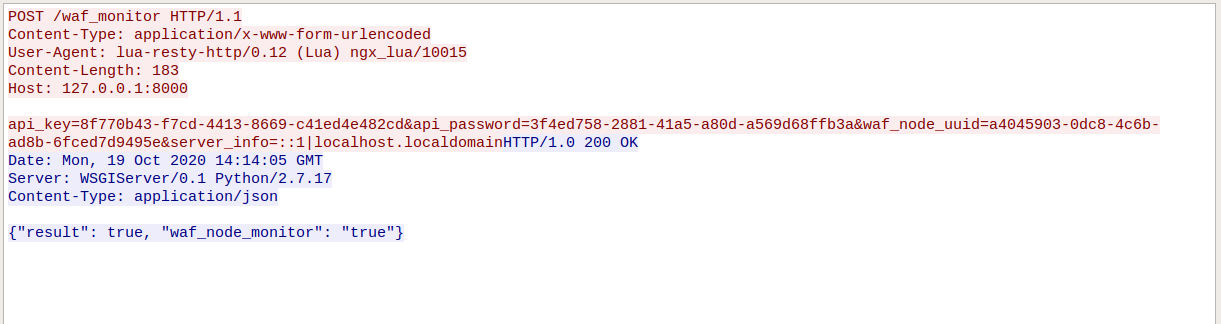
那么就进入到_momitor_update函数,其中取配置文件waf_monitor_website变量web控制台地址(本地控制台地址;之后调用http.lua模块创建http对象变量,之后设置连接超时阈值,发送超时阈值和读取超时阈值,分别以毫秒为单位;接着以post方式发送请求到控制台。
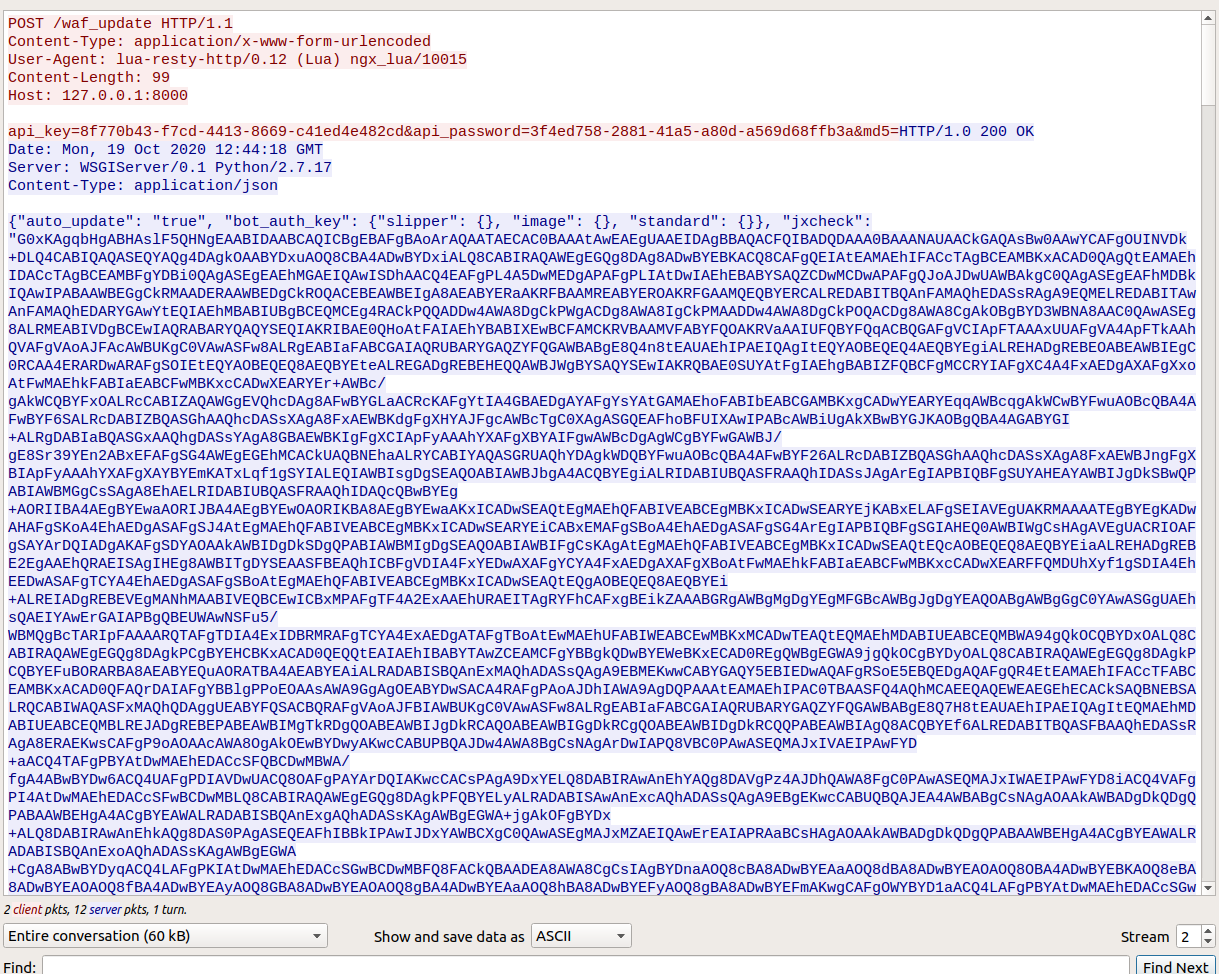
让我们抓包看一下,waf需要waf_node_monitor判断是否要进行健康检查。
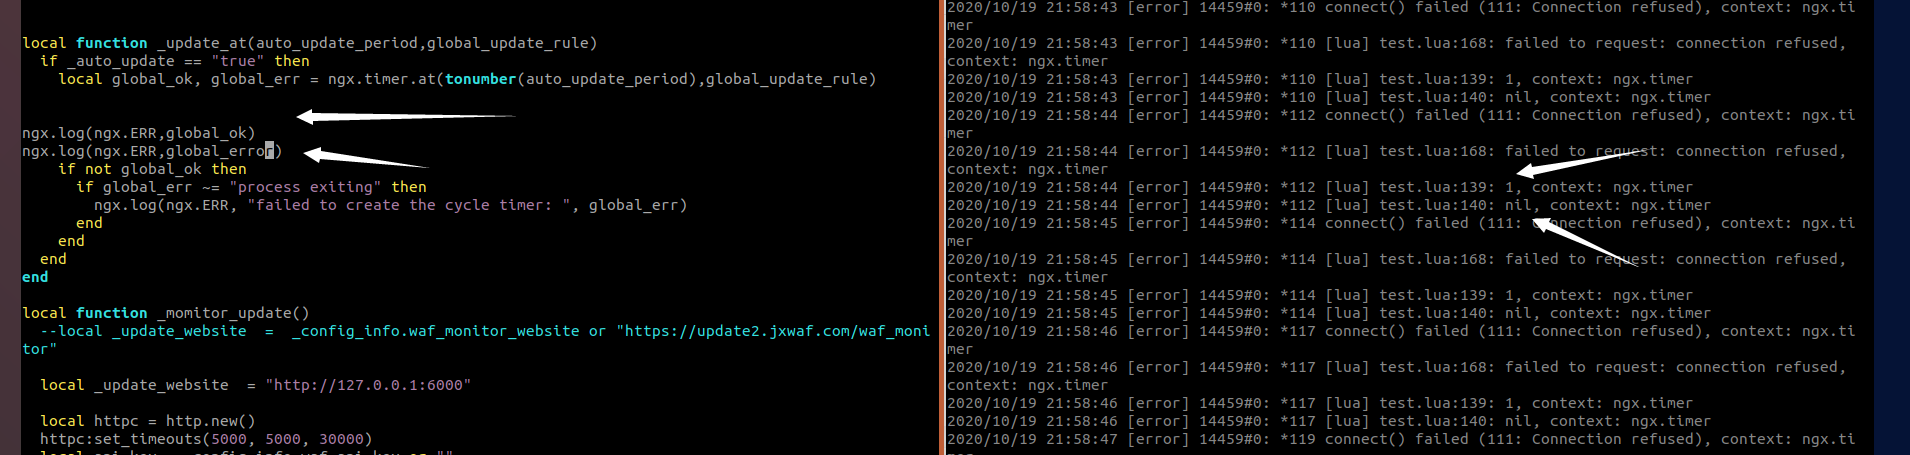
当设置web控制台地址错误的时候,会提示连接失败,并且会进入到_update_at(time,func)函数,这个函数的作用主要做定时计划的递归调用函数检测自己的错误(异步执行,不阻塞)
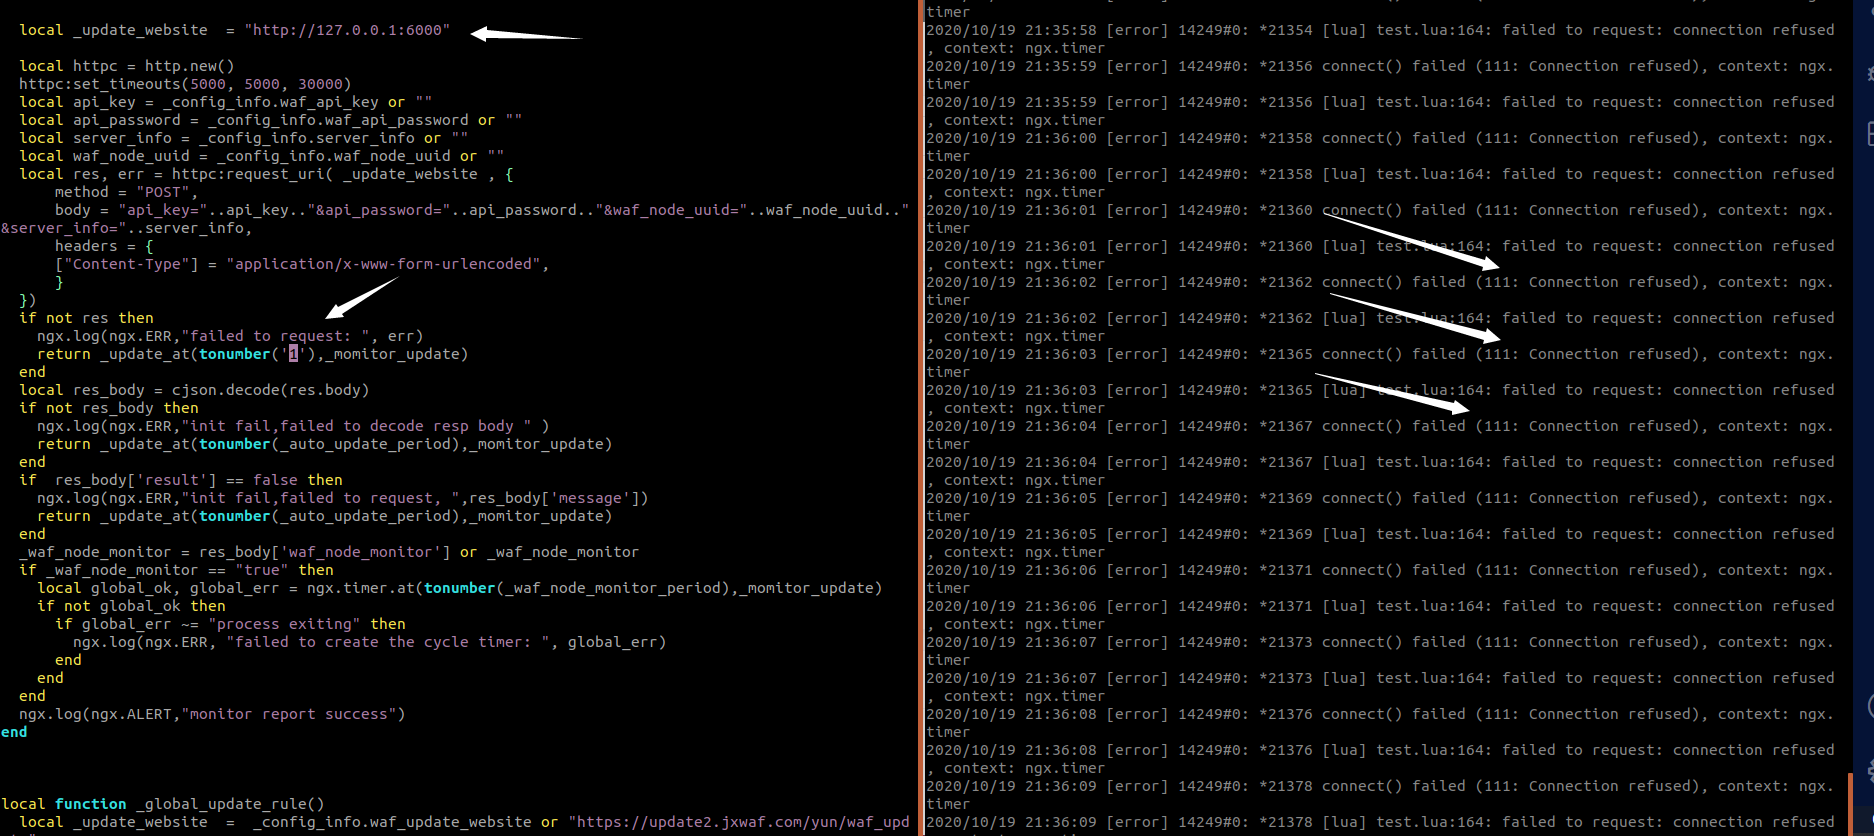
为什么说是异步执行,不阻塞,可以看到执行_momitor_update函数之后,并不会对_update_at函数阻塞,反而跳出来继续往下执行.
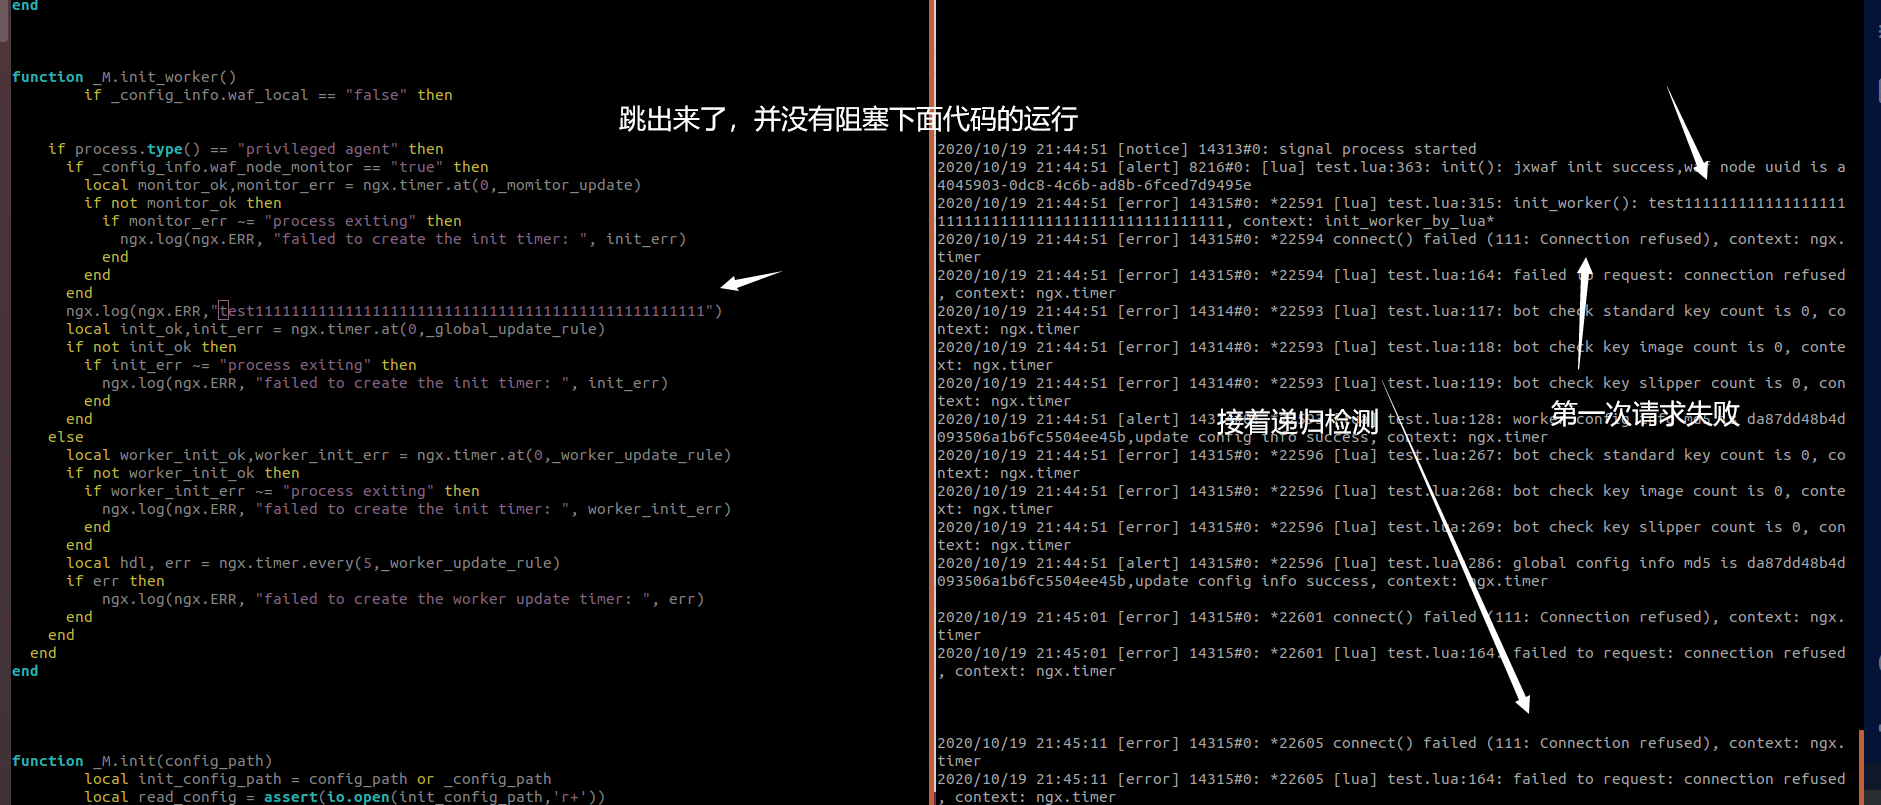
先有一个共识_update_at是一个递归循环函数,测试了一下,如果一开始就错误了,这个函数就一直错误,无论停止还是关闭,都是中断停止,并没有真正的停止,果然错误的路往下走也就只能是错误。
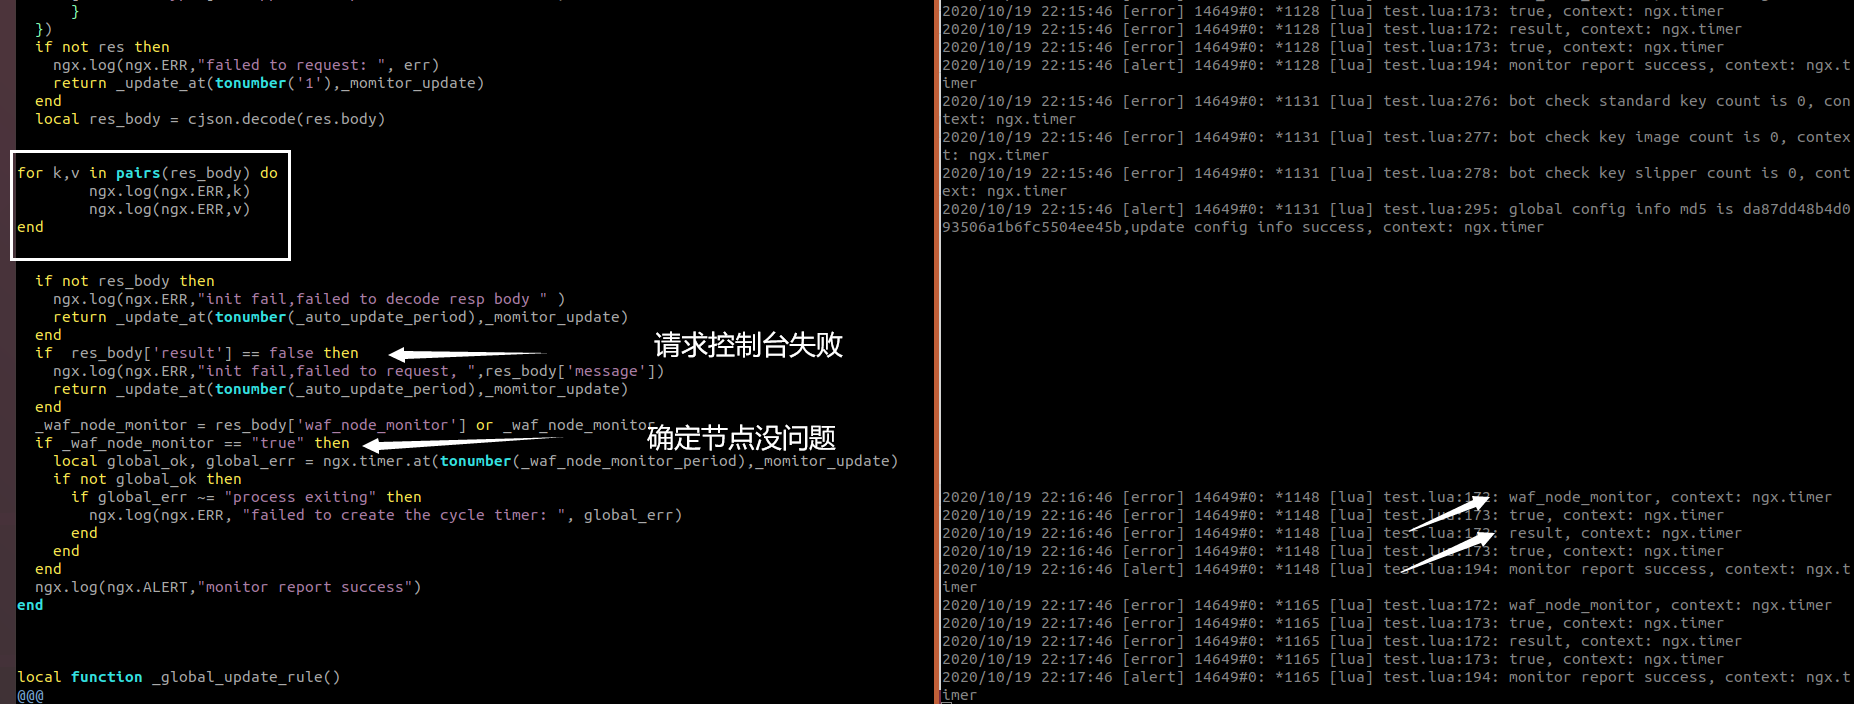
根据之前请求WEB控制台获取到信息,进行请求内容判断和健康检查的判断,确定没有问题之后输出监控成功的内容。
健康检查功能已经跑完,接下来就来到全局规则更新功能_global_update_rule,还是进入到nginx.timer.at函数里面处理。
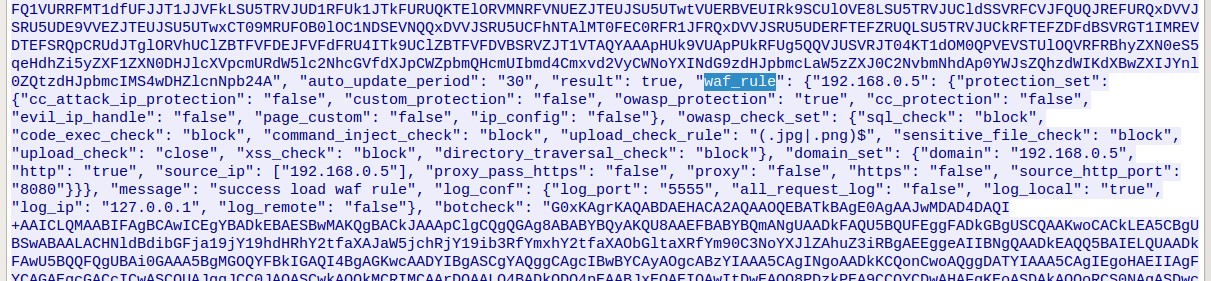
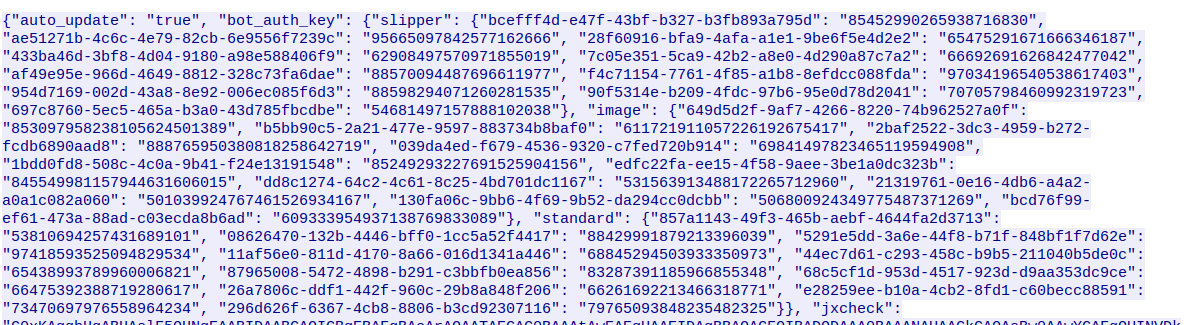
首先先向WEB控制台请求内容,让我们抓包看一下,获取什么内容?获取内容主要是语义防御以及CC防御加密规则内容。
之后的处理逻辑就是错误内容就跳进_update_at函数做递归循环,这里就不多说了。
因为我们第一次启动会判断请求返回的body有没有更新规则,第一次是没有的,所以会跳进这个判断里面。
if not res_body['no_update'] then
这段代码判断返回的内容是否符合格式
local tmp_waf_rule = res_body['waf_rule']
    if tmp_waf_rule == nil  then
      ngx.log(ngx.ERR,"init fail,can not decode waf rule")
      return _update_at(tonumber(_auto_update_period),_global_update_rule)
    else
      _update_waf_rule = tmp_waf_rule  --将规则内容赋值到这个变量
    end

    if _update_waf_rule == nil  then
      ngx.log(ngx.ERR,"init fail,can not decode waf rule")
      return _update_at(tonumber(_auto_update_period),_global_update_rule)
    end
接着读取waf_rule里面的参数内容
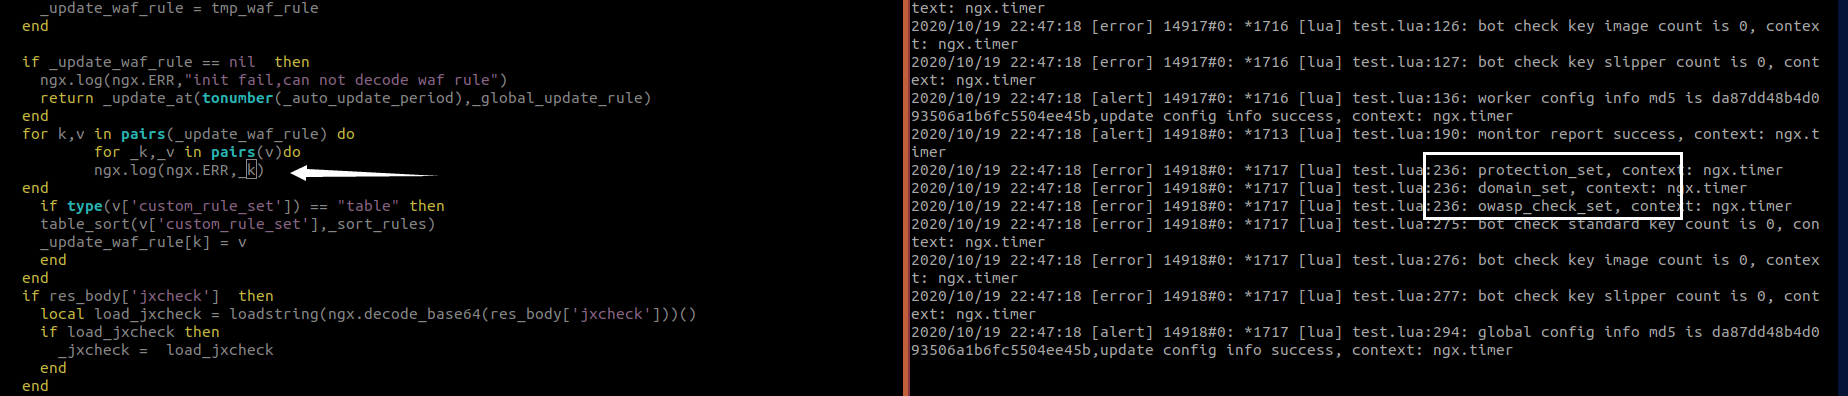
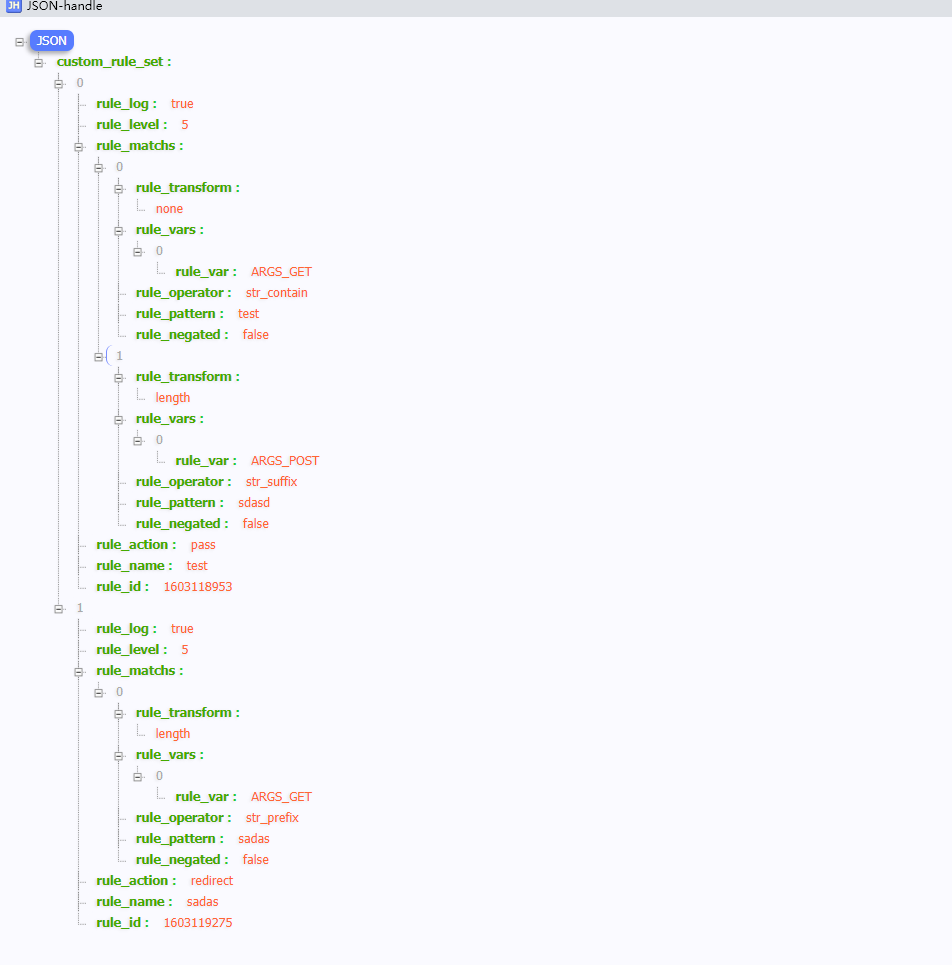
看到有这个custom_rule_set参数,就可以知道它读取web控制台的自定义规则配置的内容。
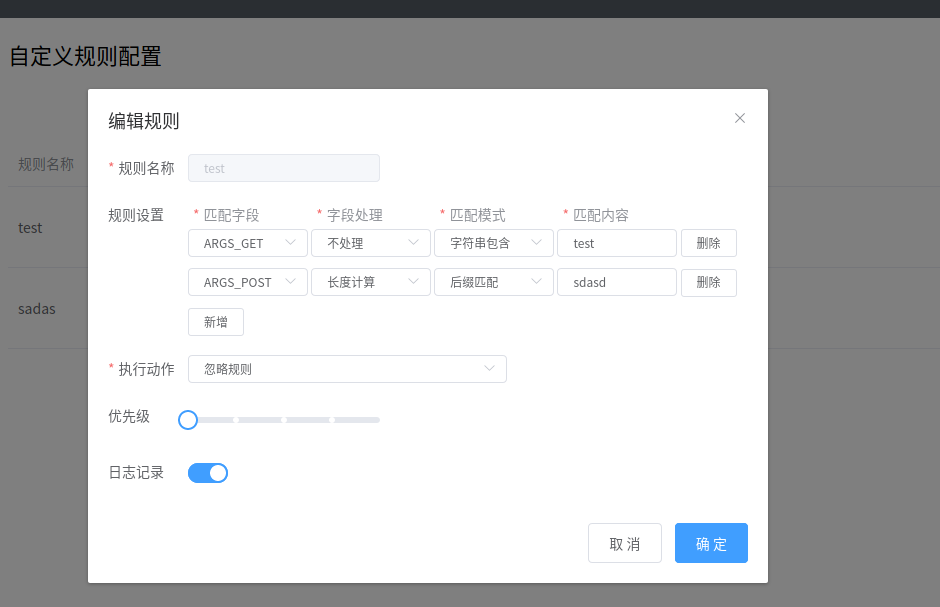
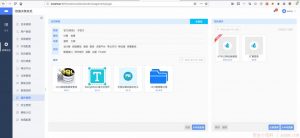
在WEB控制台拖取自定义规则内容下来的时候,抓包,可以看到每一层对应的内容是什么(因为不断嵌套,就不用pairs递归输出)。
接下来的内容就是对规则ID进行排序,最后保存回原来的_update_waf_rule变量里面,关于table排序可以参考这篇文章
local table_sort = table.sort

local function _sort_rules(a,b)
if a.rule_level == b.rule_level then
return tonumber(a.rule_id)<tonumber(b.rule_id)
else
return tonumber(a.rule_level)>tonumber(b.rule_level)
end
end


for k,v in pairs(_update_waf_rule) do
if type(v['custom_rule_set']) == "table" then
table_sort(v['custom_rule_set'],_sort_rules)
_update_waf_rule[k] = v
end
end
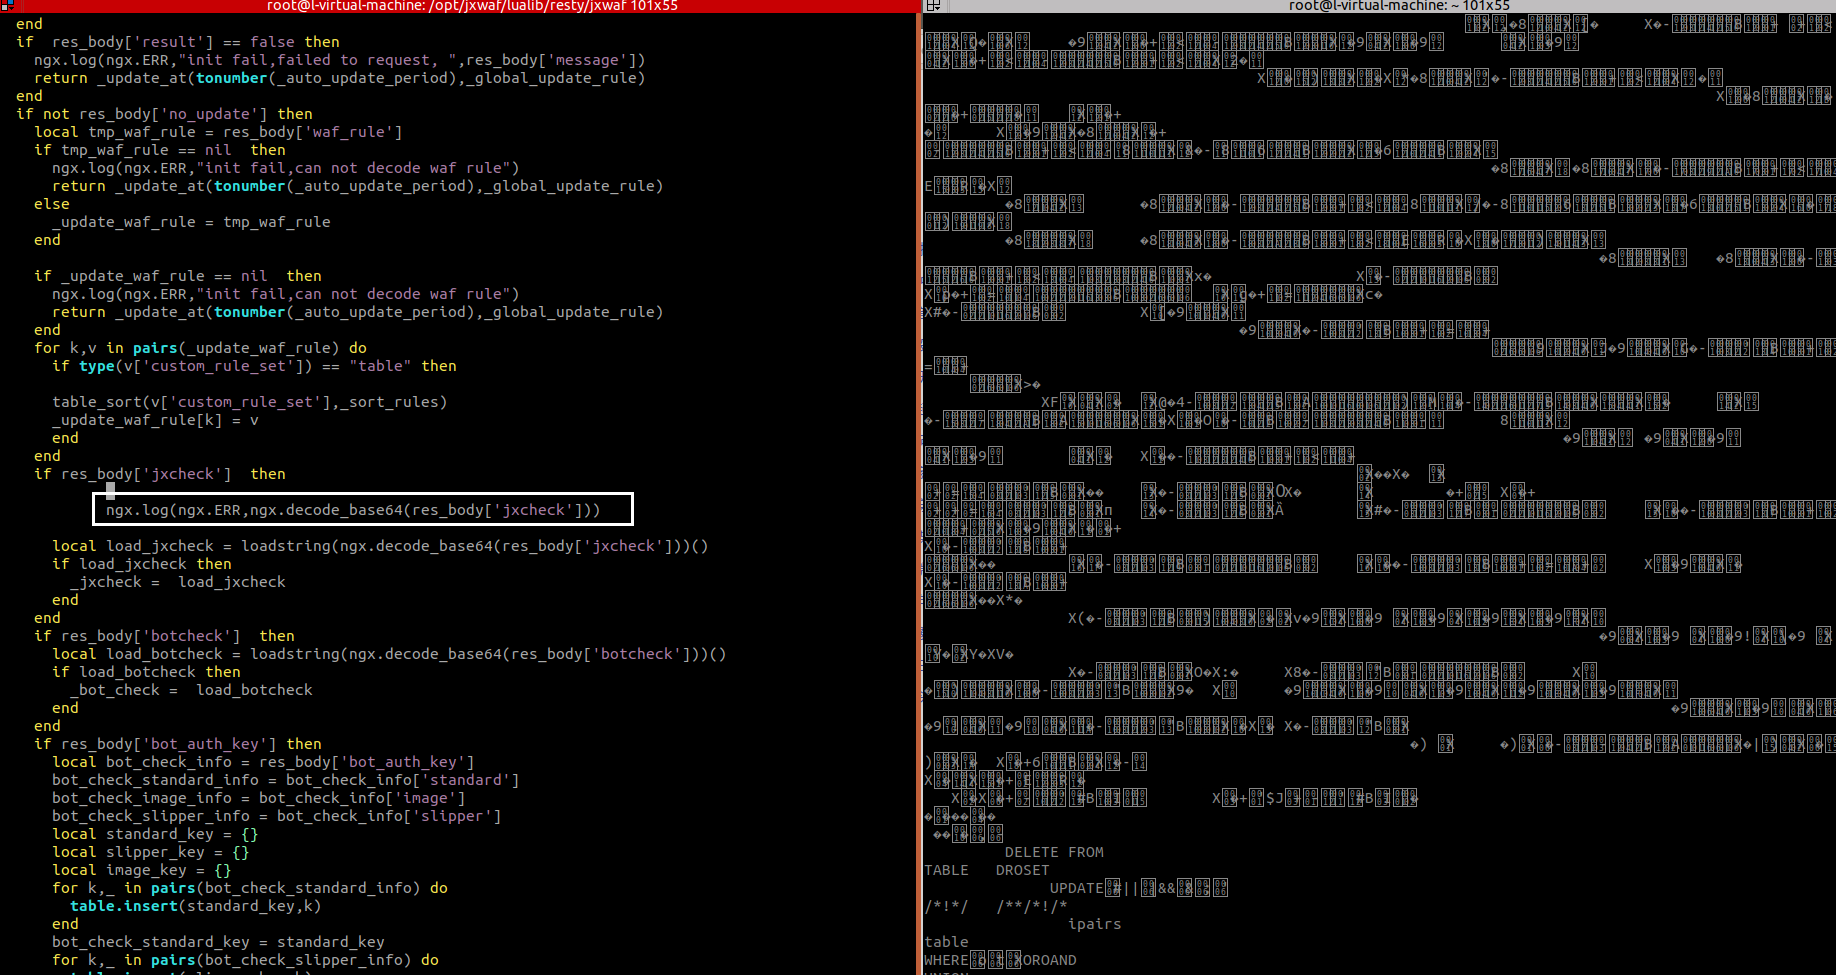
读取jxcheck内容,这里面的内容就是OWASP攻击语义分析,输出可以看到被加密了,使用loadstring函数执行外部代码也就是执行这段加密的函数
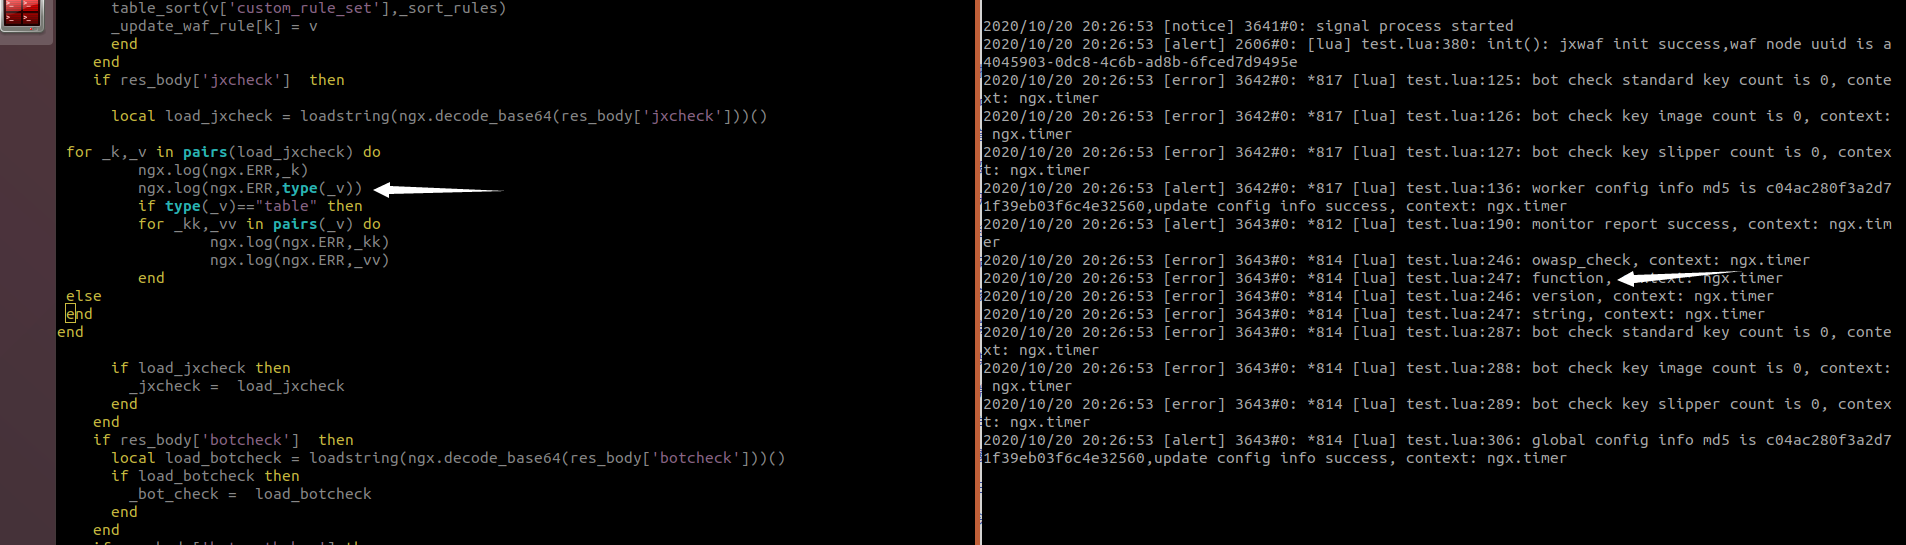
输出它的类型可以看到它是一个函数的形式运行
这段也是加密的语义函数,功能是CC攻击防护
if res_body['botcheck']  then
      local load_botcheck = loadstring(ngx.decode_base64(res_body['botcheck']))()
      if load_botcheck then
        _bot_check =  load_botcheck
      end
    end
这是加载人机识别key代码
if res_body['bot_auth_key'] then
      local bot_check_info = res_body['bot_auth_key']
      bot_check_standard_info = bot_check_info['standard']
      bot_check_image_info = bot_check_info['image']
      bot_check_slipper_info = bot_check_info['slipper']
      local standard_key = {}
      local slipper_key = {}
      local image_key = {}
      for k,_ in pairs(bot_check_standard_info) do
        table.insert(standard_key,k)
      end
      bot_check_standard_key = standard_key
      for k,_ in pairs(bot_check_slipper_info) do
        table.insert(slipper_key,k)
      end
      bot_check_slipper_key = slipper_key
      for k,_ in pairs(bot_check_image_info) do
        table.insert(image_key,k)
      end
      bot_check_image_key = image_key
      ngx.log(ngx.ERR, "bot check standard key count is ",#bot_check_standard_key)
      ngx.log(ngx.ERR, "bot check key image count is ",#bot_check_slipper_key)
      ngx.log(ngx.ERR, "bot check key slipper count is ",#bot_check_image_key)
    end
接着加载waf日志转发的配置
if res_body['log_conf']  then
      _log_conf = res_body['log_conf']
    end
"log_conf": {"log_port": "5555", "all_request_log": "false", "log_local": "true", "log_ip": "127.0.0.1", "log_remote": "false"}
接着将WEB控制台的内容保存在共享内存字典中,waf_common_conf变量已经在nginx.conf配置文件定义成为共享内存变量,所以现在就是要将body保存在它里面。它的作用就是特权代理去控制台取body,保存在共享内存变量,不同的worker自行读取共享内存变量。
local waf_common_conf = ngx.shared.waf_common_conf
local md5_succ, md5_err = waf_common_conf:set("md5",res_body['md5'])
if md5_err then
ngx.log(ngx.ERR,"init fail,can not set waf_common_conf md5")
return _update_at(tonumber(_auto_update_period),_global_update_rule)
end


local res_body_succ, res_body_err = waf_common_conf:set("res_body",res.body)
if res_body_err then
ngx.log(ngx.ERR,"init fail,can not set waf_common_conf res_body")
return _update_at(tonumber(_auto_update_period),_global_update_rule)
end
_md5 = res_body['md5']
ngx.log(ngx.ALERT,"global config info md5 is ".._md5..",update config info success")
好了,关于特权代理这一部分就讲完了,接下来就是worker的处理。
worker
其实也没有什么可以讲的=-=,你会发现处理逻辑也是一样的。下面这一段代码就是worker取内存变量的内容,之后就是上面的逻辑,取语义规则。。。。
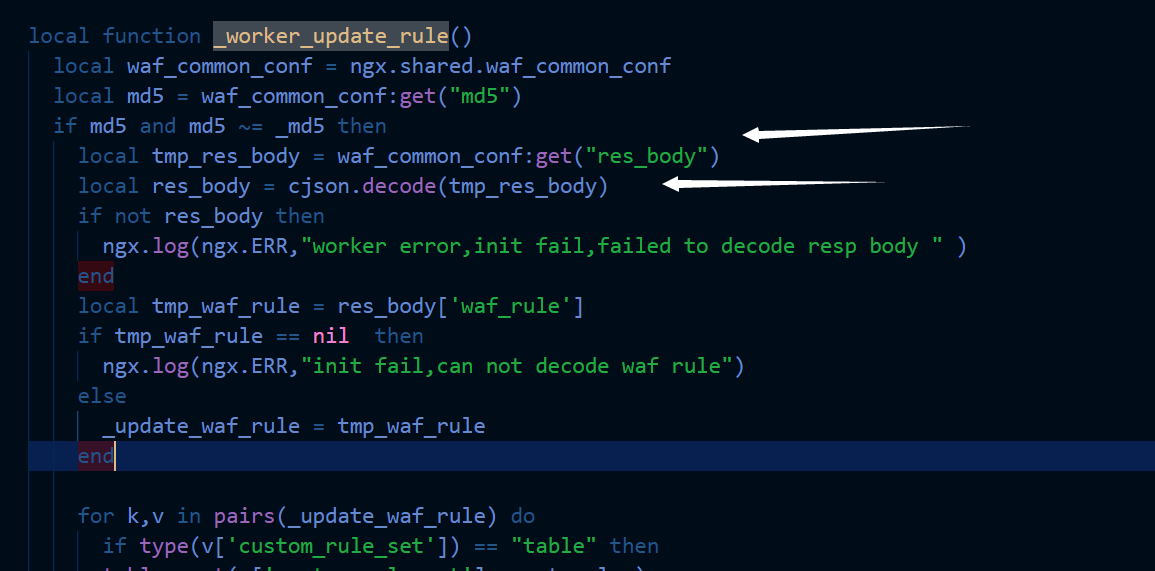
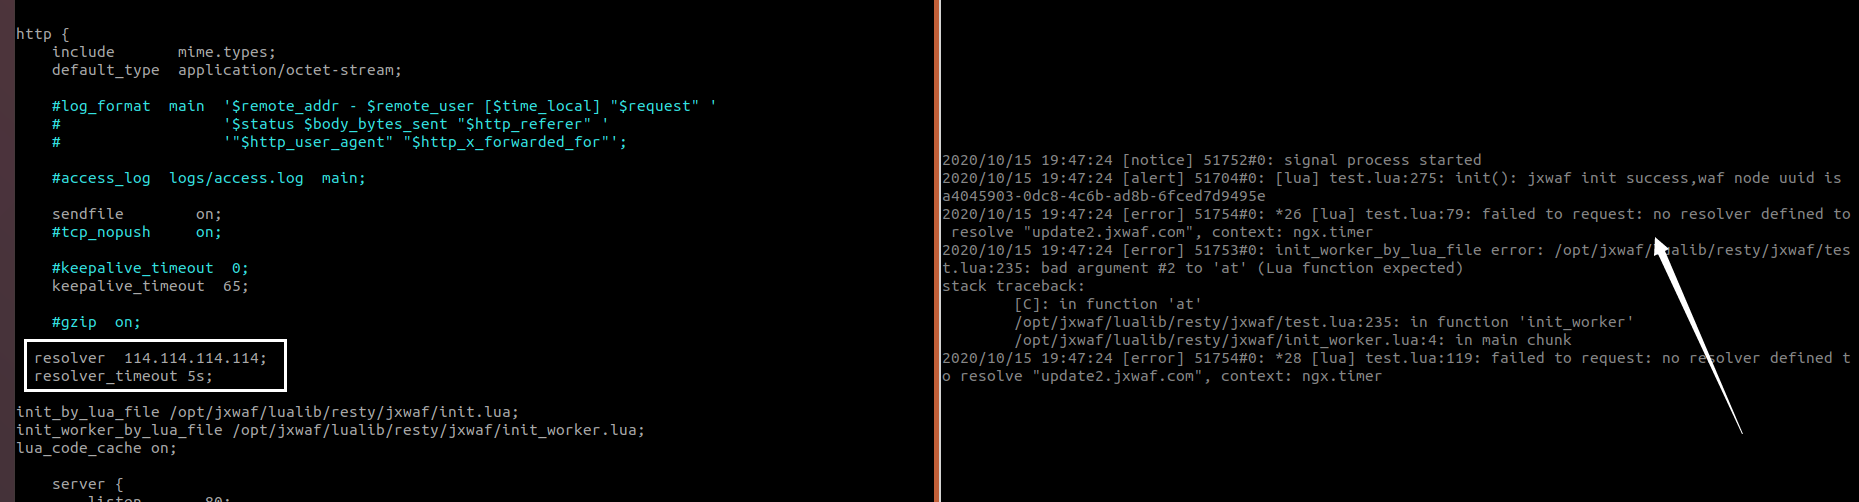
还有一个细节需要注意的是,需要在nginx配置DNS解析IP,不然就会报错。
来源:freebuf.com 2020-10-29 12:18:19 by: 陌度
© 版权声明
文章版权归作者所有,未经允许请勿转载。
THE END
喜欢就支持一下吧


请登录后发表评论
注册