说明
本文内容:配置桥接网卡,使Proxmox VE(PVE)可以同时创建NAT虚拟机和独立IP虚拟机,同时可以使用脚本映射NAT虚拟机的端口到外网
前言
有台5IP的机器,虽然配置不怎么样,但是也开了不少虚拟机,可用的4个IP挪来挪去着实不够用,遂产生了开NAT虚拟机的想法。
但是能开NAT虚拟机的同时,独立IP的机器也要能开通,毕竟有些服务转发起来也蛮麻烦的。
请教了一下谷姓同学,鼓捣了一下,测试可行,作为备忘,记录如下:
方法
1、桥接网卡配置
编辑网卡文件
nano /etc/network/interfaces
内容如下:
| # This file describes the network interfaces available on your system | |
| # and how to activate them. For more information, see interfaces(5). | |
| source /etc/network/interfaces.d/* | |
| auto lo | |
| iface lo inet loopback | |
| allow-hotplug enp4s0 | |
| iface enp4s0 inet manual | |
| auto vmbr0 | |
| iface vmbr0 inet static | |
| address 111.1.11.130/29 | |
| netmask 255.255.255.248 | |
| gateway 111.1.11.129 | |
| bridge-ports enp4s0 | |
| bridge-stp off | |
| bridge-fd 0 | |
| auto vmbr1 | |
| iface vmbr1 inet static | |
| address 192.168.1.1 | |
| netmask 255.255.255.0 | |
| bridge_ports none | |
| bridge_stp off | |
| bridge_fd 0 | |
| post-up echo 1 > /proc/sys/net/ipv4/ip_forward | |
| post-up bash /root/iptables.config.sh | |
| post-up iptables -t nat -A POSTROUTING -s ‘192.168.1.0/24‘ -o vmbr0 -j MASQUERADE | |
| post-down iptables -t nat -D POSTROUTING -s ‘192.168.1.0/24‘ -o vmbr0 -j MASQUERADE |
物理机的网卡名为enp4s0,vmbr0为独立IP虚拟机的桥接网卡,自行修改为正确的信息;vmbr1为NAT虚拟机的桥接网卡,可以使用192.168.1.2-255这些内网IP。
2、新建虚拟机
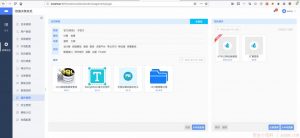
开通独立IP虚拟机的时候桥接网卡选择vmbr0,NAT虚拟机选择vmbr1,如图所示

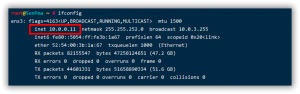
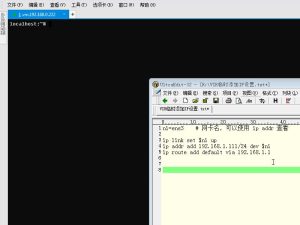
安装完成后,配置网卡信息,IP地址配置为内网IP地址,如图所示

配置完成后测试,使用Proxmox VNC功能登录虚拟机,测试可以正常联网
3、NAT转发
很多时候,NAT虚拟机单单能连接外部网络是不够的,还需要外部网络能够访问到虚拟机内部的服务,比如ssh,rdp等。
端口映射可以使用iptables来完整,已经有大佬写了方便的脚本,点我下载
脚本内容:
iptables.sh
| PATH=/bin:/sbin:/usr/bin:/usr/sbin:/usr/local/bin:/usr/local/sbin:~/bin | |
| export PATH | |
| #ConfFile | |
| iptablesconf=‘/root/iptables.config.sh’ | |
| function rootness(){ | |
| if [[ $EUID -ne 0 ]]; then | |
| echo “脚本需要以ROOT权限运行!” | |
| exit 1 | |
| fi | |
| } | |
| function conf_list(){ | |
| cat $iptablesconf | |
| } | |
| function conf_add(){ | |
| if [ ! -f $iptablesconf ];then | |
| echo “找不到配置文件!” | |
| exit 1 | |
| fi | |
| echo “请输入虚拟机的内网IP” | |
| read -p “(Default: Exit):” confvmip | |
| [ -z “$confvmip“ ] && exit 1 | |
| echo | |
| echo “虚拟机内网IP = $confvmip“ | |
| echo | |
| while true | |
| do | |
| echo “请输入虚拟机的端口:” | |
| read -p “(默认端口: 22):” confvmport | |
| [ -z “$confvmport“ ] && confvmport=“22” | |
| expr $confvmport + 0 &>/dev/null | |
| if [ $? -eq 0 ]; then | |
| if [ $confvmport -ge 1 ] && [ $confvmport -le 65535 ]; then | |
| echo | |
| echo “虚拟机端口 = $confvmport“ | |
| echo | |
| break | |
| else | |
| echo “输入错误,端口范围应为1-65535!” | |
| fi | |
| else | |
| echo “输入错误,端口范围应为1-65535!” | |
| fi | |
| done | |
| echo | |
| while true | |
| do | |
| echo “请输入宿主机的端口” | |
| read -p “(默认端口: 8899):” natconfport | |
| [ -z “$natconfport“ ] && natconfport=“8899” | |
| expr $natconfport + 0 &>/dev/null | |
| if [ $? -eq 0 ]; then | |
| if [ $natconfport -ge 1 ] && [ $natconfport -le 65535 ]; then | |
| echo | |
| echo “宿主机端口 = $natconfport“ | |
| echo | |
| break | |
| else | |
| echo “输入错误,端口范围应为1-65535!” | |
| fi | |
| else | |
| echo “输入错误,端口范围应为1-65535!” | |
| fi | |
| done | |
| echo “请输入转发协议:” | |
| read -p “(tcp 或者 udp ,回车默认操作: 退出):” conftype | |
| [ -z “$conftype“ ] && exit 1 | |
| echo | |
| echo “协议类型 = $conftype“ | |
| echo | |
| iptablesshell=“iptables -t nat -A PREROUTING -i vmbr0 -p $conftype –dport $natconfport -j DNAT –to-destination $confvmip:$confvmport“ | |
| if [ `grep -c “$iptablesshell“ $iptablesconf` != ‘0’ ]; then | |
| echo “配置已经存在” | |
| exit 1 | |
| fi | |
| get_char(){ | |
| SAVEDSTTY=`stty -g` | |
| stty –echo | |
| stty cbreak | |
| dd if=/dev/tty bs=1 count=1 2> /dev/null | |
| stty -raw | |
| stty echo | |
| stty $SAVEDSTTY | |
| } | |
| echo | |
| echo “回车继续,Ctrl+C退出脚本” | |
| char=`get_char` | |
| echo $iptablesshell >> $iptablesconf | |
| runreturn=`$iptablesshell` | |
| echo $runreturn | |
| echo ‘配置添加成功’ | |
| } | |
| function add_confs(){ | |
| rootness | |
| conf_add | |
| } | |
| function del_conf(){ | |
| echo | |
| while true | |
| do | |
| echo “请输入宿主机的端口” | |
| read -p “(默认操作: 退出):” confserverport | |
| [ -z “$confserverport“ ] && exit 1 | |
| expr $confserverport + 0 &>/dev/null | |
| if [ $? -eq 0 ]; then | |
| if [ $confserverport -ge 1 ] && [ $confserverport -le 65535 ]; then | |
| echo | |
| echo “宿主机端口 = $confserverport“ | |
| echo | |
| break | |
| else | |
| echo “输入错误,端口范围应为1-65535!” | |
| fi | |
| else | |
| echo “输入错误,端口范围应为1-65535!” | |
| fi | |
| done | |
| echo | |
| iptablesshelldel=`cat $iptablesconf | grep “dport $confserverport“` | |
| if [ ! -n “$iptablesshelldel“ ]; then | |
| echo “配置文件中没有该宿主机的端口” | |
| exit 1 | |
| fi | |
| iptablesshelldelshell=`echo ${iptablesshelldel//-A/-D}` | |
| runreturn=`$iptablesshelldelshell` | |
| echo $runreturn | |
| sed -i “/$iptablesshelldel/d” $iptablesconf | |
| echo ‘配置删除成功’ | |
| } | |
| function del_confs(){ | |
| printf “你确定要删除配置吗?操作是不可逆的(y/n) “ | |
| printf “n” | |
| read -p “(默认: n):” answer | |
| if [ -z $answer ]; then | |
| answer=“n” | |
| fi | |
| if [ “$answer“ = “y” ]; then | |
| rootness | |
| del_conf | |
| else | |
| echo “配置删除操作取消” | |
| fi | |
| } | |
| action=$1 | |
| case “$action“ in | |
| add) | |
| add_confs | |
| ;; | |
| list) | |
| conf_list | |
| ;; | |
| del) | |
| del_confs | |
| ;; | |
| *) | |
| echo “参数错误! [${action} ]” | |
| echo “用法: `basename $0` {add|list|del}” | |
| ;; | |
| esac |
iptables.config.sh (配置文件)
使用方法:
上传脚本到宿主机root目录,赋予iptables.config.sh可执行权限
| bash iptables.sh add | |
| bash iptables.sh del |
如图所示

测试连接成功,如图

来源
脚本作者:https://github.com/flyqie
参考:https://pve.proxmox.com/wiki/Network_Configuration
相关推荐: 小蜜蜂微信公众号文章助手(BeePress)2.2.1
小蜜蜂微信公众号文章助手(BeePress)2.2.1 来源:小蜜蜂微信公众号日期:2020/01/14 16:11 浏览: 支持系统(当前版本2.2.1) 支持双平台:macOS、Windows 最近微信手机安卓客户端改版了(7.0.5), 没有以往的历…


请登录后发表评论
注册